

PayPal is one of the most popular payment gateways out there. It’s so popular that it’s hard to imagine a time when people weren’t using it.
Thanks to the advancement in technology, anything that you need to make your business run smoothly is now available to you. Back in 2004, WooCommerce wasn’t even a thing yet. The founders of WooCommerce saw an opportunity to make eCommerce more accessible to everyone, so they created an open-source platform that could be used for free by anyone.
Since then, Paypal has become a household name for online shopping and payments. But how do you set up your WooCommerce store with Paypal? Let’s take a look at some of the essential steps to set up your WooCommerce store with Paypal successfully.
Getting to know WooCommerce
WooCommerce is a free, open-source eCommerce platform that allows you to set up your online store. It’s designed to be used with WordPress, so it’s easy to integrate into your existing website and start selling immediately.
WooCommerce is popular because it’s powerful, flexible, and easy to use. It can handle anything from simple purchases to complex fulfillment processes and integrates seamlessly with other WordPress features like themes and plugins.
In addition to being free, WooCommerce has an active community of freelancers, such as developers and experts in digital marketing, who contribute new features on a regular basis. These features are available for anyone who wants them – you don’t have to pay for any upgrades or add-ons.
PayPal: More than just a payment channel
PayPal is a payment platform that allows users to send and receive money online. The PayPal system is used by more than 200 million people in over 200 countries and offers both a web-based interface and a mobile app.
PayPal’s primary function is to facilitate e-commerce transactions between buyers and sellers. In addition to its established business model, PayPal offers other services, including person-to-person payments and money transfers.
The ability of PayPal to integrate with eCommerce platforms made it possible for businesses to leverage and expand their operations. With a seamless payment system, buyers and sellers can exchange goods and currencies anywhere, anytime.
Why go for PayPal for your eCommerce store?
PayPal offers a variety of advantages for WooCommerce users that can help you make your store more robust.
Paypal has an established presence in the e-commerce space, and millions worldwide use it to purchase goods online. If you’re considering using PayPal as a payment option in your WooCommerce store, there are several reasons why you might want to do so:
- Security: PayPal is a well-known and trusted brand in e-commerce, and for a good reason. They use state-of-the-art security measures to ensure your customer information is safe, including 128-bit encryption technology and fraud protection.
- Convenience: PayPal makes it easy for customers to pay with their credit card or bank account balance without having to enter any information on their end. You don’t have to worry about collecting personal data from your shoppers; PayPal takes care of everything.
- Flexibility: You can add multiple payment options on a single checkout page; this allows customers who prefer one method over another (such as credit card over debit) to choose which option works best for them at checkout time.
Risks you need to know
There are several risks associated with using PayPal for WooCommerce:
- PayPal bans accounts: If you use PayPal as a payment processor, your account can be banned from using their services anytime. This means you’ll no longer be able to accept payments through their platform.
- Chargebacks: Chargebacks occur when a customer disputes their purchase by claiming they didn’t receive the product they ordered or didn’t authorize the purchase in the first place.
Chargebacks can negatively affect your business because they’ll incur fees. It may result in negative reviews on top of losing money on returned items or refunds given out due to chargebacks filed against your business. Most of the time, this is filed by customers who claimed they did not receive products they purchased through PayPal when they did receive them (or vice versa).
PayPal can also withhold your funds if they suspect fraud. PayPal has the right to hold onto any money you receive through them until they are sure you aren’t engaged in fraudulent activity. If PayPal suspects you of fraud, they could hold your funds for weeks or even months before releasing them.
Setting up PayPal in WooCommerce
Setting up PayPal in WooCommerce is a great way to add an extra layer of security to your online store. The PayPal module allows you to collect credit card information to process payments without having a customer enter their payment information again.
This helps ensure that your customer’s information is protected and helps them feel more confident about making purchases from you.
1. Enable PayPal as a payment method on WooCommerce
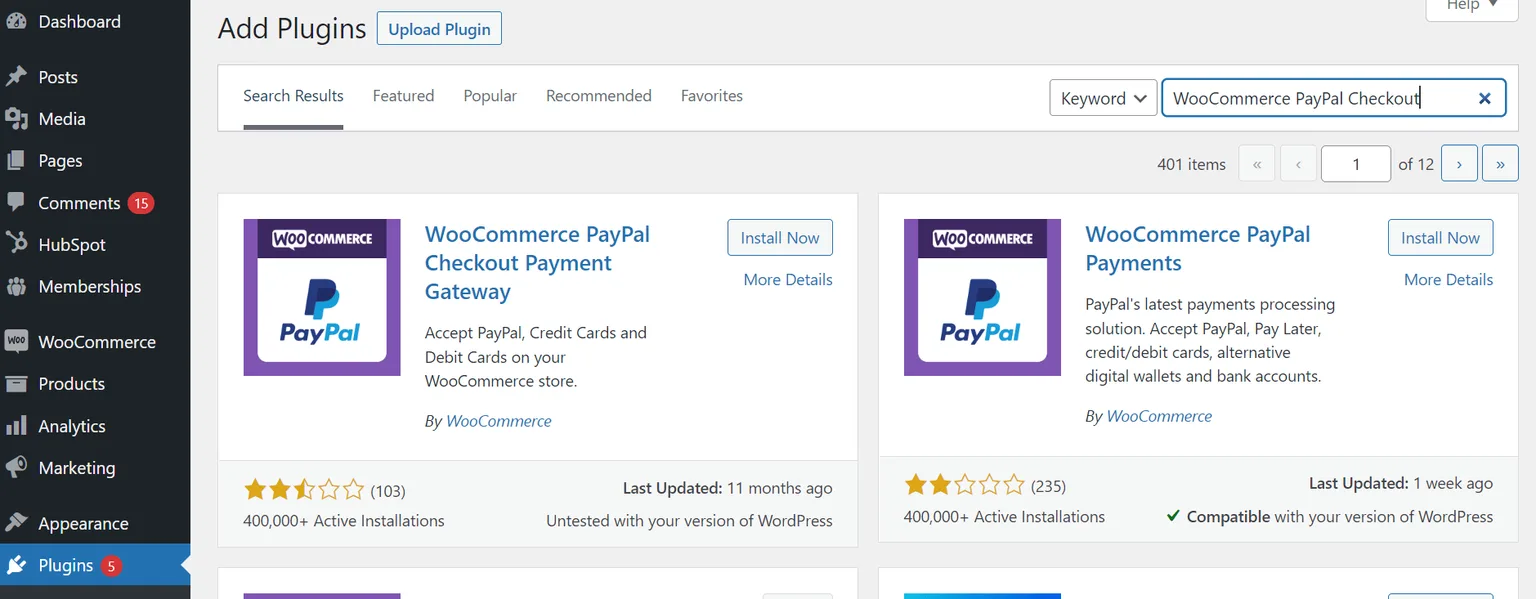
The WooCommerce PayPal Payments plugin allows you to connect your PayPal account to your WooCommerce store.
To add PayPal to your WordPress site, go to your WordPress Dashboard and click on WooCommerce. In the search box, type “PayPal” and choose it from the results list. Find and click the “PayPal” plugin for WooCommerce payments. After which, click “Install Now.” After you install the plugin, you need to activate it on the same site.
The PayPal for WooCommerce plugin allows you to customize your store’s payment method.
In the WooCommerce settings, click on the Payments tab. Go to PayPal, and turn on the accept PayPal option in your online store.
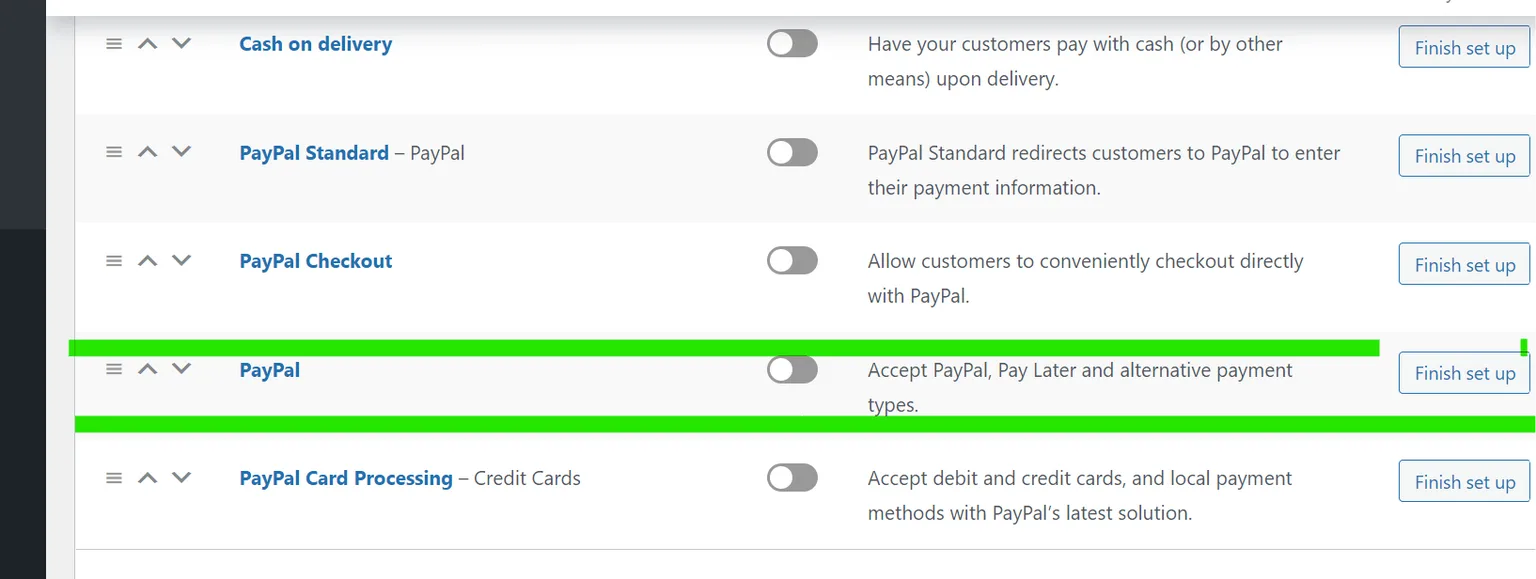
After you’ve logged in to PayPal and chosen your account type, you’ll be able to either automatically sign in using PayPal credentials or manually enter your information.
2. Input your WooCommerce store’s PayPal details
When you choose the manual credential input option, you’ll be taken to a page where you can input your PayPal store details. You can get this information from your PayPal account.
Now, there are two types of PayPal accounts: business and individual.
Business accounts allow businesses to accept payments from customers through PayPal. If you are a business owner, you can apply for a PayPal account to accept customer payments. On the other hand, individual accounts allow individuals to use the service for personal purposes, such as making online purchases or sending money to friends and family members.
If you don’t have a business PayPal account, you must open one. You’ll need to visit the PayPal website and click “Sign Up.” You’ll then be prompted to enter your email address and password. Choose business as your PayPal account on the accounts page.
You’ll need to provide basic information about your company, including its full legal name (which can be different from your personal name), location, and contact information.
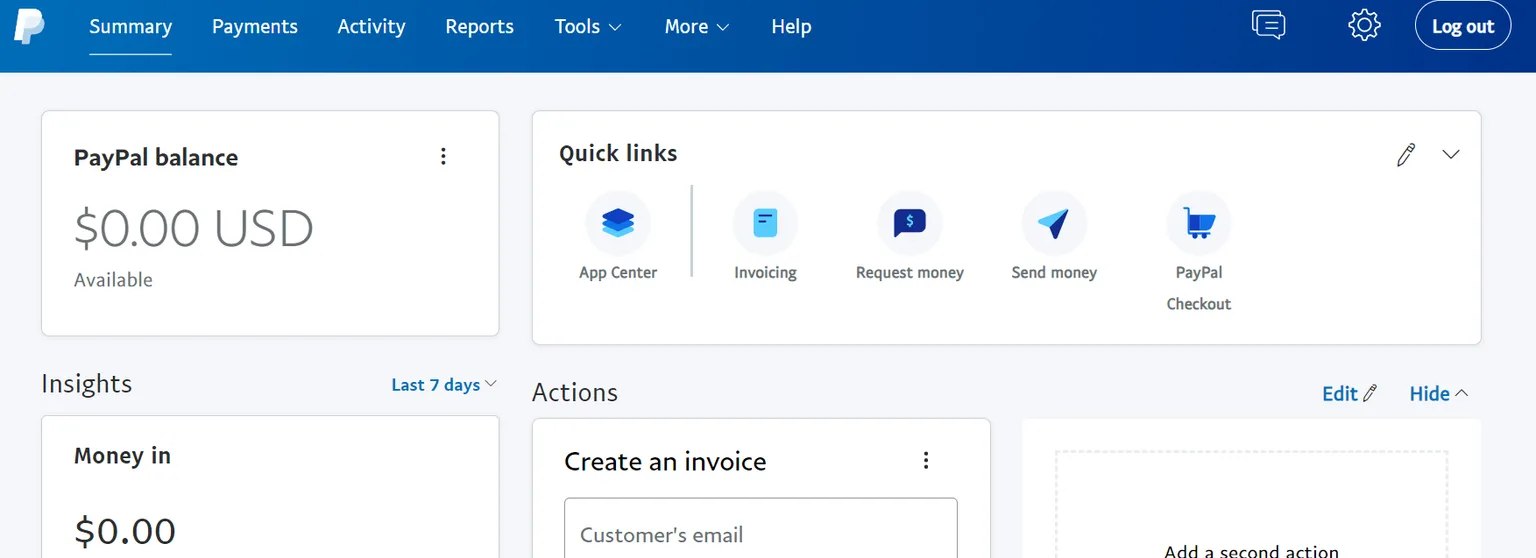
To get started, log into your PayPal account and click on the Accounts tab. On the left-hand side of the screen, click Settings. The Account Settings page will appear. Click on Business Information. You will be taken to a page where you can edit your business information and add other details about your company.
In this step, you’ll collect the information to help you continue setting up your account in Step 1.

Navigate to the left sidebar and click on Business information. On the right, you will find the PayPal Merchant ID. To complete the signup process, you’ll need to provide your client ID and password, so you must also take note of that.
You can now log in to developer.paypal.com with your PayPal account information. In the top right corner of your profile, click the Dashboard. You’ll see a section called “My apps & credentials.” Click “Create App” after hitting the live button.
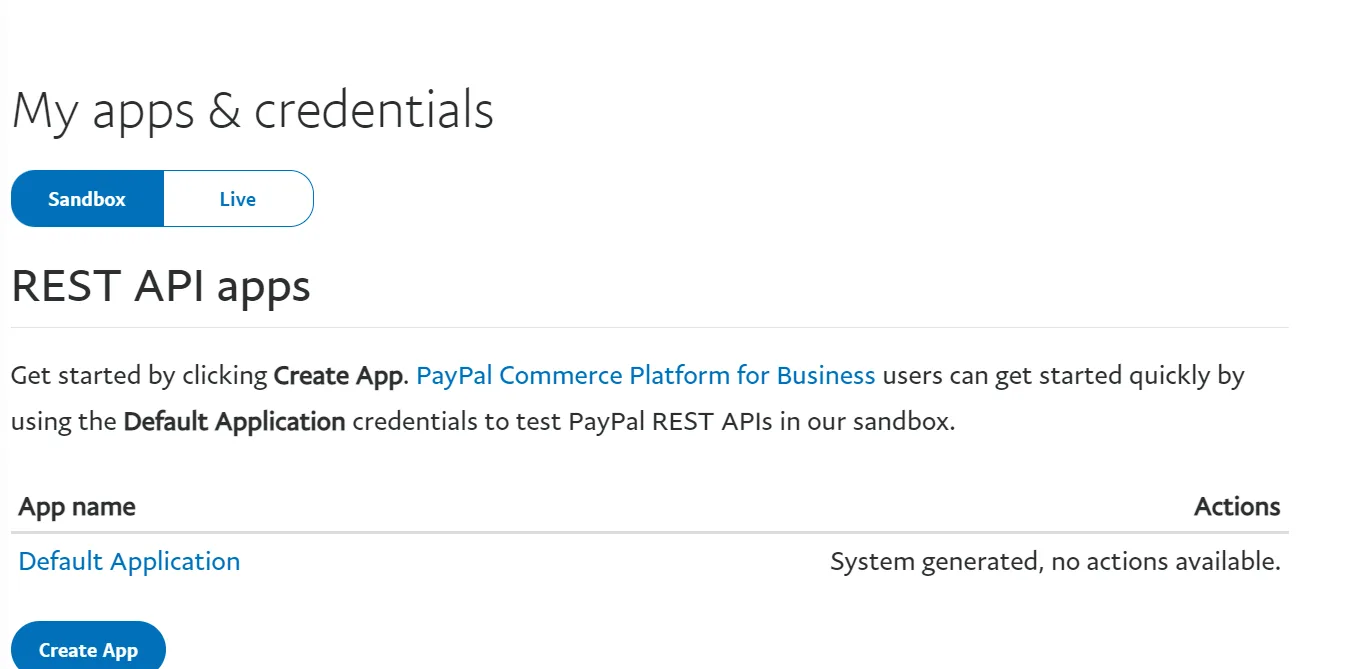
In the new screen, fill out your new app’s name before clicking Create App. Now that you’ve created your app let’s take a look at the next steps.
You can find your live secret key and Client ID on the next screen.
Once you have the information, return to your WordPress dashboard and complete your PayPal credentials using your collected data.
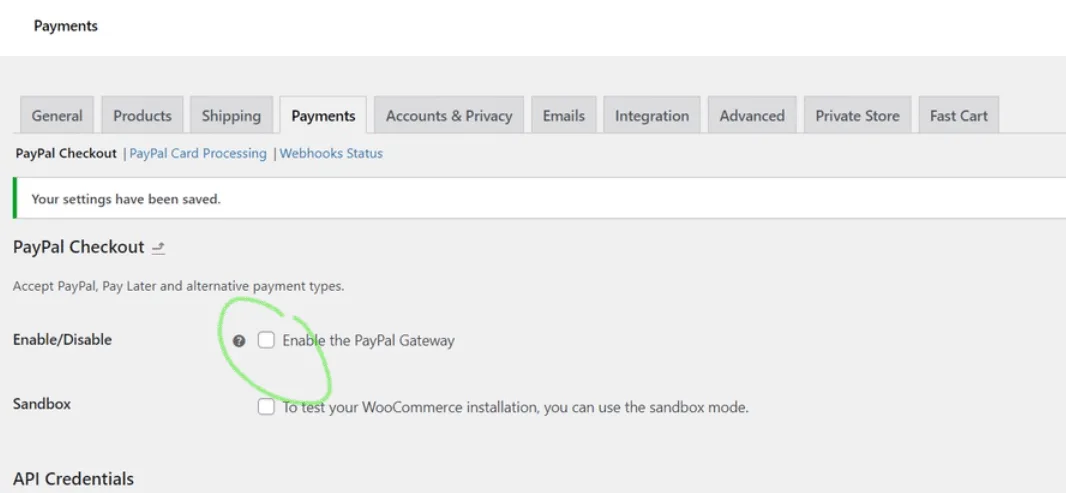
Fill out the data, check for accuracy, and press Save changes. When adding PayPal checkout settings, you’ll see additional settings where you can fill in the intent, description, and title of your PayPal account.
To finish the PayPal checkout configuration, please click on the checkbox labeled “Enable the PayPal Gateway.”
3. Allow notifications for Instant Payments
Instant Payment Notifications are messages sent by the payment processor to your server when a payment has been made. This allows you to track payments and take actions like refreshing balances or sending confirmation emails.
To use and access this functionality, go to the dashboard of your business account. From there, click on the “Website Payments” tab and select “Instant Payment Notifications.” After which, click on refresh.
You can add an IPN URL by clicking on the link “Choose IPN Settings” on the next screen.
Enter the URL where your account’s IPN messages will be directed. This can be any URL that has been confirmed in your account settings. Follow this URL format: https://domain_name.com/?wc-api=WC_Gateway_Paypal.
After that, you can enable the option to receive IPN messages and hit Save.
PayPal Checkout can send customers back to your website after they have completed their transaction. This provides an easy opportunity for you to redirect your customers to the order confirmation page. You can get your customers to read your blog, go to the shop and look at the products, or even offer them a free resource for later upsell.
To activate auto return, go to your dashboard and look for Website payments.
From there, select Website Settings and Refresh. You’ll be prompted to enter a return URL—this is the link that PayPal will use when processing your refund requests. Use this format for the return URL: https://business_domain.com/checkout/order-received/.
To customize your PayPal integration, you can go to the PayPal page and select “Further Customize” from the drop-down. Here, you can set up mobile number requirements during checkout or even allow Giropay and bank transfers.
Finally, your PayPal WooCommerce integration is almost ready. The final step is to test it to ensure that it works.
4. Testing PayPal for WooCommerce
PayPal Sandbox is an online tool that allows you to test your PayPal payment integration. You can enter any amount, currency, description, and transaction note. In addition, you can preview the checkout flow, including a list of all possible payment methods for your store.
To test the PayPal plugin for WooCommerce, you’ll need to create a sandbox account and test it on your site. This is a great way to make sure everything is working as it should before you start accepting credit card payments.
Other PayPal plugins you might want to consider
If you’re looking for a way to accept PayPal payments on your WooCommerce site, it helps to know your options.
With so many plugins available, knowing which one will work best for your unique needs can be challenging. The following are just a few of the most popular choices:
- PayPal Express Checkout: It adds a new payment method with an intuitive checkout flow and secure payment handling. For example, orders can be captured automatically and sent to PayPal for processing, or you can manually create an order in PayPal by clicking on the “Process Order” button.
- Braintree: It’s compatible with all major credit card brands and has a PCI-certified infrastructure, so you can rest assured that your customer’s information is safe.
Final thoughts
PayPal is a popular payment processor with an easy-to-use interface. It’s a good choice if you want to integrate payment processing into your website without having to learn how to code or hire a developer.
As you work to set up PayPal for your WooCommerce store, remember that it’s important to be thorough and detailed in your setup process. Pay attention to every step of the process, and make sure you’ve double-checked all of your information before moving on. This will help ensure that you don’t miss anything and that your store is fully functional when it goes live.
You don’t want to be frustrated because something isn’t working when customers start shopping. Your focus should be on making sure everything is working perfectly for them.