

Site navigation is a vital element of any website. It directly affects the ways your visitors interact with your website, and how you obtain your goal. But the menu space is limited on all websites. In case, you have so many pages and want to navigate customers to many places on your site, you can use dropdown menus. This article covers the overview of dropdown menus and presents the way to create a WordPress dropdown menu for beginners. Let’s get started!
- An Overview about WordPress Navigation
- Why Use Dropdown Menus in WordPress?
- Things to consider when designing a WordPress dropdown menu
- How to create a dropdown menu on a WordPress site?
- Method #1: Create a WordPress Dropdown Menu without a Plugin
- Method #2: Create a WordPress Dropdown Menu with a Plugin
- Conclusion
An Overview about WordPress Navigation
WordPress is the most popular platform to create eCommerce websites. By default, it comes with a built-in menu management system that helps you add navigation menus to your WordPress sites easily.
Navigation menus are links to the main pages of your website that usually appear on the top as a horizontal row right next to the website’s logo.

The navigational structure of your site will partly affect the purchasing behavior of your customers. Having a well-designed navigation menu is one of the key factors that help you to boost conversions and decrease your bounce rate. In contrast, poor navigation can decrease the site’s usability and accessibility.
With a well-planned navigational menu, visitors can find what they are looking for on your WordPress site faster and more easily. They may be your shop page, contact form, blog page, or any other converting content.
Why Use Dropdown Menus in WordPress?
As mentioned earlier, a simple WordPress menu will fit your website if you are creating a website with only a few pages.
But could it be possible if you are running a WooCommerce store with various category pages and shop pages?
In cases when you have more pages that are really important and want to include more links to the navigation menu, dropdown menus (also known as nested menus) will be an ideal choice to solve the limited menu space. This simple feature can help shoppers access whatever they need on your site, easily and quickly, which keeps visitors around for longer and reduces your bounce rates.
With dropdown menu feature, you can also have many other ways to display menu than the traditional ones.
For example, they can add an additional footer menu at the bottom of your pages. It may display the same content or slightly different options as your main menu.

Another option is sidebar menu, so that customers always see the menu wherever they are on your site.

Shop owners can also apply is the menu overlay which can be opened or hid with a single click.

All of these menu options can help you increase user experience and improve conversion.
Things to consider when designing a WordPress dropdown menu
The purpose of having a dropdown menu is to enhance the user experience. So, before going to the details, we are giving some tips that you should consider while designing your WordPress dropdown menu to make it more powerful and bring you more benefits.
1. Make it clear and concise
Remember, you’re designing a navigational menu with accessibility and usefulness for your readers to find information more easily. It means you have to define clear menus and group relevant content for visitors to instantly know where they are and what to expect.
2. Don’t clutter it
Incorporating too many pages can make visitors overwhelmed and make navigation harder instead of easier. So you shouldn’t make the menu complicated or over depth, but avoid a dropdown menu with more than two levels. It becomes tricky to use and destroys usability.
3. Make it proper
When creating menus, you should arrange them appropriately! For example, if you have a menu titled “About”, you wouldn’t want to have your “Contact” and “FAQ” in the dropdown menu. On that note, we suggest having “Contact”, “FAQ”, and “About” as separate menu options.
How to create a dropdown menu on a WordPress site?
Method #1: Create a WordPress Dropdown Menu without a Plugin
Step 1. Choosing a Theme with Dropdown Menu Support
WordPress provides you with a built-in menu management system but the dropdown menu is displayed or not is completely dependent on your WordPress theme.
Therefore, before starting with the detailed process, you must choose a WordPress theme that supports dropdown menus.
You need to make sure that you are using a WordPress theme that supports dropdown menus.
How can you define if the theme you are using supports the dropdown menu?
You can simply visit the theme’s website where you’ll find a link to the theme’s demo. From there you can see if the demo is showing a proper dropdown menu in the navigation menu. In this step, you need to carefully choose a WordPress theme that both supports dropdown menus and fits your niches and requirements.
If it is not, then you’ll need to find a WordPress theme that works better.
In this tutorial, I would like to introduce you Woostify free theme for those who are launching a WordPress eCommerce store. The theme completely focuses on boosting sales and also allows you to make powerful dropdown navigational menus.

Now, let’s continue the process with the following detailed steps.
Step 2: Create a simple WordPress Menu
What you see on the menu page will vary slightly depending on your theme.
Note: If you have already had a navigation menu on your WordPress site, just skip this step and move to the next ones or edit the available one.
In this guide, I will create a new WordPress menu.
To create a simple menu, in your WordPress dashboard, go to Appearance > Menus

Then click on the “Create a new menu” link from the top page

In the Menu structure section, type in the Menu Name box, and tick on the options you want for the Menu Settings to choose the locations to display the menu.

There are two things to consider:
- The Display locations may be different depending on the theme you are using. Usually, you’ll want to pick something like Primary Menu when you want to make your menu appear in the header. And you can tick Footer Menu if you want to show it on the site footer, and Mobile Menu in caase you wish to show it on mobile devices.
- If you check the Automatically add new top-level pages to this menu option, it will add any new pages you create to the menu. You shouldn’t select it sinceit can make the menu confusing and hard to navigate.
And finally, just hit the Create Menu button.
Step 3: Add menu items
Once creating a simple menu, now you need to start adding some WordPress menu items. As mentioned before, you should keep your menu simple and neat by adding the most relevant pages to it.
There are a few different ways to go about adding your menu items, among which Pages and Posts are the most popular ones.
In the sidebar of the menu editor, simply tick the options you want to include in the WordPress menu, and click on the Add to Menu button.

You can also add custom links. This involves providing the URL for the place you wish to direct users to. After that, you can click on Add to Menu.

Next, you should select categories/product categories that will take users to an archive page where they can see all the content on a specific topic they are interested in. And then click on Add to Menu again to finish this step.


Step 4: Set Your Menu Structure
As soon as adding all desired items to the WordPress menu, you will see them listed separately in the Menu Structure on the menu editor page.

To make your dropdown menu work well, you need to consider putting submenus properly inside the existing items to make it become a dropdown menu.
You can easily change their position and manage them to meet your design with some drag and drop.

If there is any item you don’t want to include in the menu, you can easily remove it by clicking on it and hit the Remove link.

Once completed, just click on the Save Menu button at the right bottom to update your changes.

Then, you can check out your site on the front end to see how your WordPress dropdown menu works.
Step 5: Add other elements to your WordPress dropdown menu (Optional)
This section is an advanced step for those who want to create their own style dropdown menu. You can totally pass this step if you are satisfied with the menu you have created.
Here, I mention 2 ways that you can further customize your WordPress dropdown menu.
Add custom CSS
You can make your menu more styling by adding custom CSS classes. To do this, start by clicking on Screen Options at the top of your menu editor:

Then you tick the CSS Classes option.

This will add a CSS Classes field to all items and sub-items in your dropdown menu:

Then, you can include any custom CSS codes to any menu items and make them meet your requirements.
Incorporate Images
Another element that you may consider is including images into your menus to make your menu more visual and attract visitors.
The best way to incorporate images into the menu is by using a WordPress dropdown menu plugin. There are many dropdown menu plugins for WordPress out there, for example, WP Responsive Menu, Max Mega Menu, and Menu Image, Icons Made Easy.
In this way, you can add visual elements to your dropdown menu without the worry about bothering with any code on your WordPress site. In this tutorial, I will use the Menu Image, Icons Made Easy plugin to add images to my dropdown menu in WordPress.
First, you need to install the plugin to your WordPress site by going to Plugins > Add New > search for the plugin > Install Now

Once installing the plugin, you should activate it and do some settings as below:

Once finishing, return to the menu editor, you will see the Menu Image button in all menu items and sub-items under the Menu Structure.

Now you can add photos/ logos to any menu items you want by clicking on the Menu Image button, and selecting images from your library.

After finishing all changes, remember to Save Changes.
Step 6: Preview Your Menu
Now, you have mostly finished creating your WordPress dropdown menu, but you should check it out before publishing.
From the top right menu editor page, click on the Manage with Live Preview button.

In here, select Menus then you will see a list of menus on your WordPress site.

Choose the WordPress dropdown menu that you have created to check.

In the WordPress Customizer, you can not only check your drop down menu, but also have a more visual way to customize it.

In here, you can drag and drop to change the position of any menu items, make any necessary adjustments, and see how the menu is displayed on different devices such as desktops, tablets, and mobile directly on the friendly editor interface.
Step 7: Publish Your WordPress dropdown Menu
Check and customize the menu until you are happy with it, then click on the Publish button on the top page to make the menu live on your site, and allow visitors to see it.

You can create different menus and display them in various locations by following the steps above. Of course, you can use Customizer for them too.
Method #2: Create a WordPress Dropdown Menu with a Plugin
If you are reading this, chances are your theme does not support dropdown menus. In this case, you need a WordPress dropdown menu plugin. We recommend Max Mega Menu. This is the most popular free plugin that handles this type of task.
Step #1: Enable the Dropdown Feature for a Menu
After installing and activating the plugin, follow the below instructions:
- Go to the Mega Menu > Menu Locations page from the WordPress dashboard.
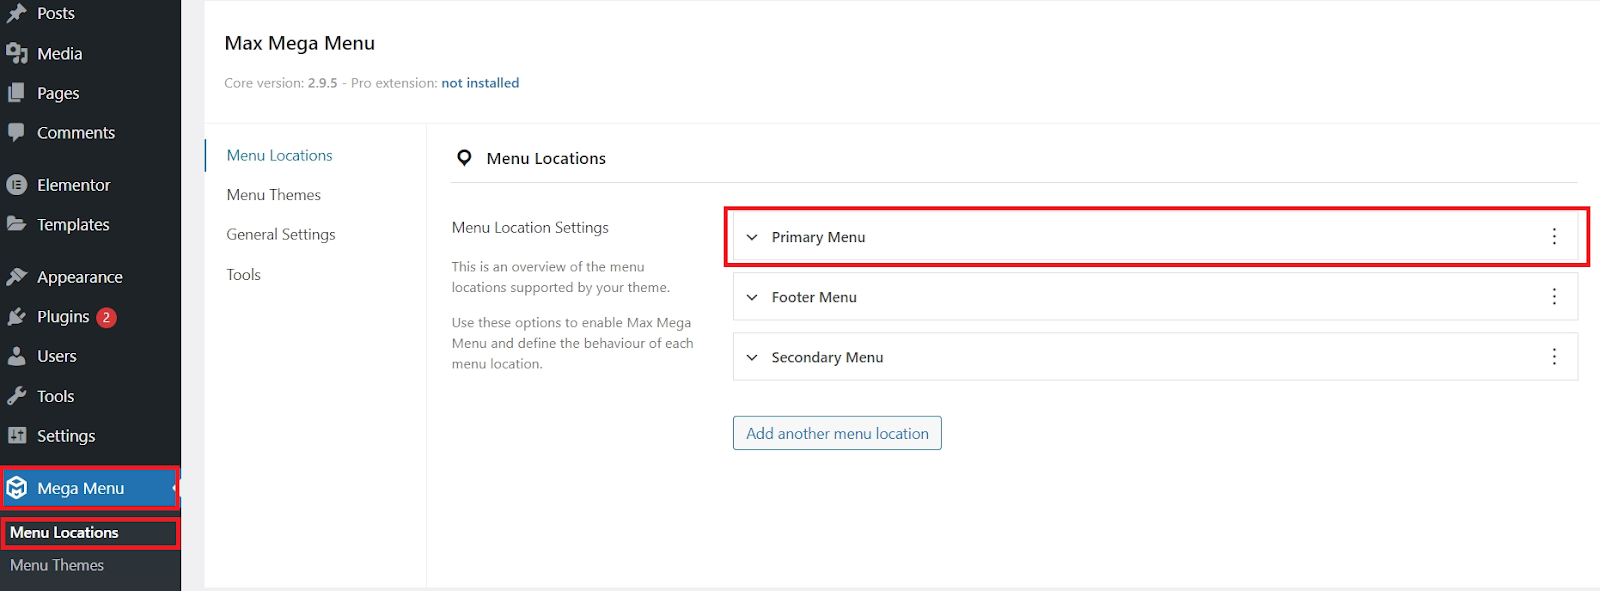
Now, let’s say you want to add a dropdown to the Primary Menu. If your site does not have any menus yet, see Step #2 of Method #1 to learn how to create one through WordPress’s built-in functionality.
- Click Primary Menu on the settings page.
- Make sure to tick the box to allow dropdown menus for this menu. Remember that you can enable dropdowns for all of the menus on your WordPress site, not just one.
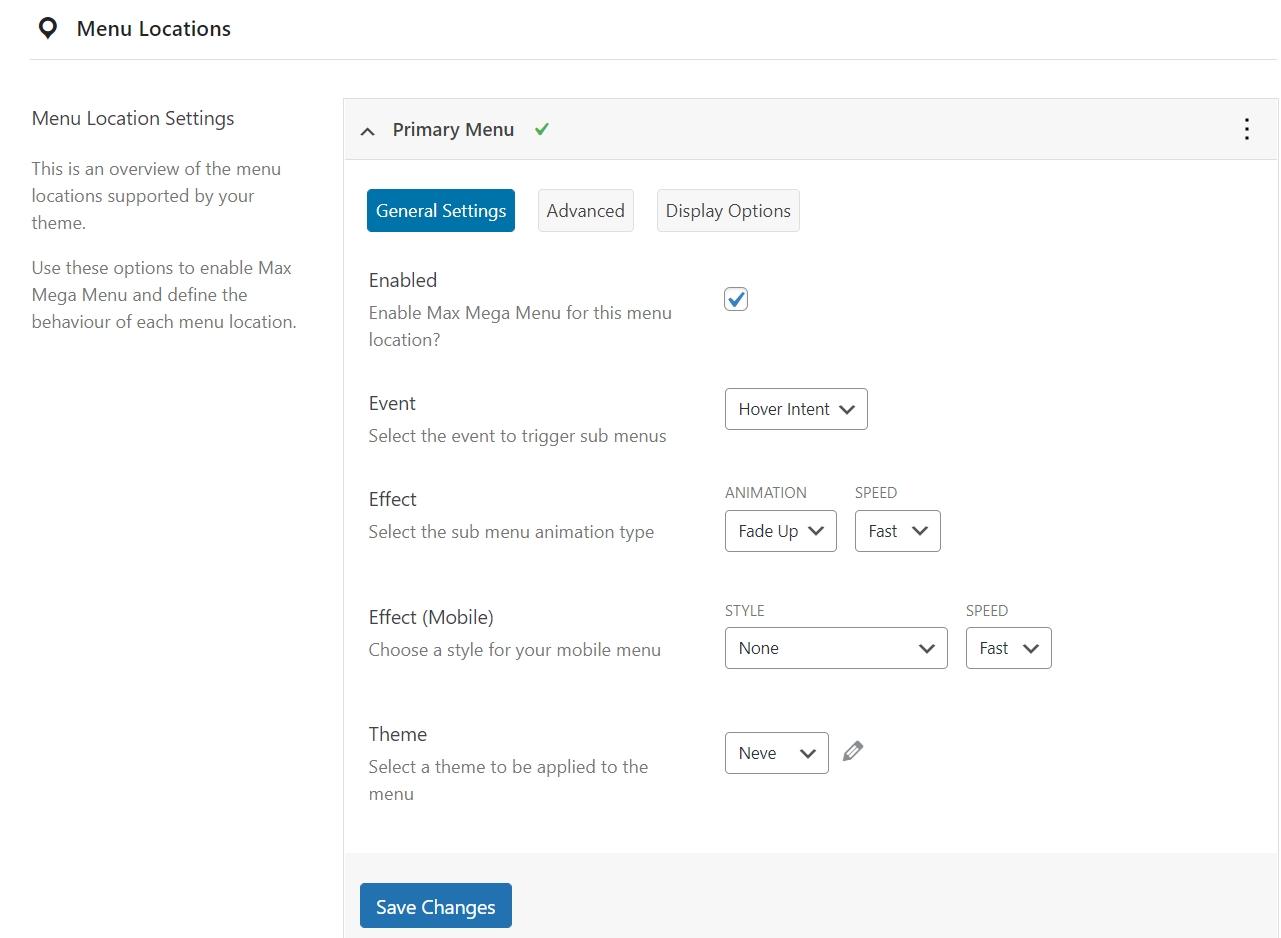
- After that, select the event that fires the submenu. For example, the submenu will drop down when people hover or click on the main menu on your WordPress site.
- Next, choose the animations that run with the dropdown menu for desktop and mobile.
- Last but not least, pick the style of the menu. You can display the default menu style that the plugin provides or let the menu inherit the current theme’s style.
- Finally, remember to click the Save Changes button before moving on to the next step.
Step #2: Create a Dropdown Menu in WordPress
- After that, you need to go to the Appearance > Menus page from the WordPress dashboard.
- Next, select the Primary Menu (or the one you have enabled the dropdown feature for) in the “Select a menu to edit” field.
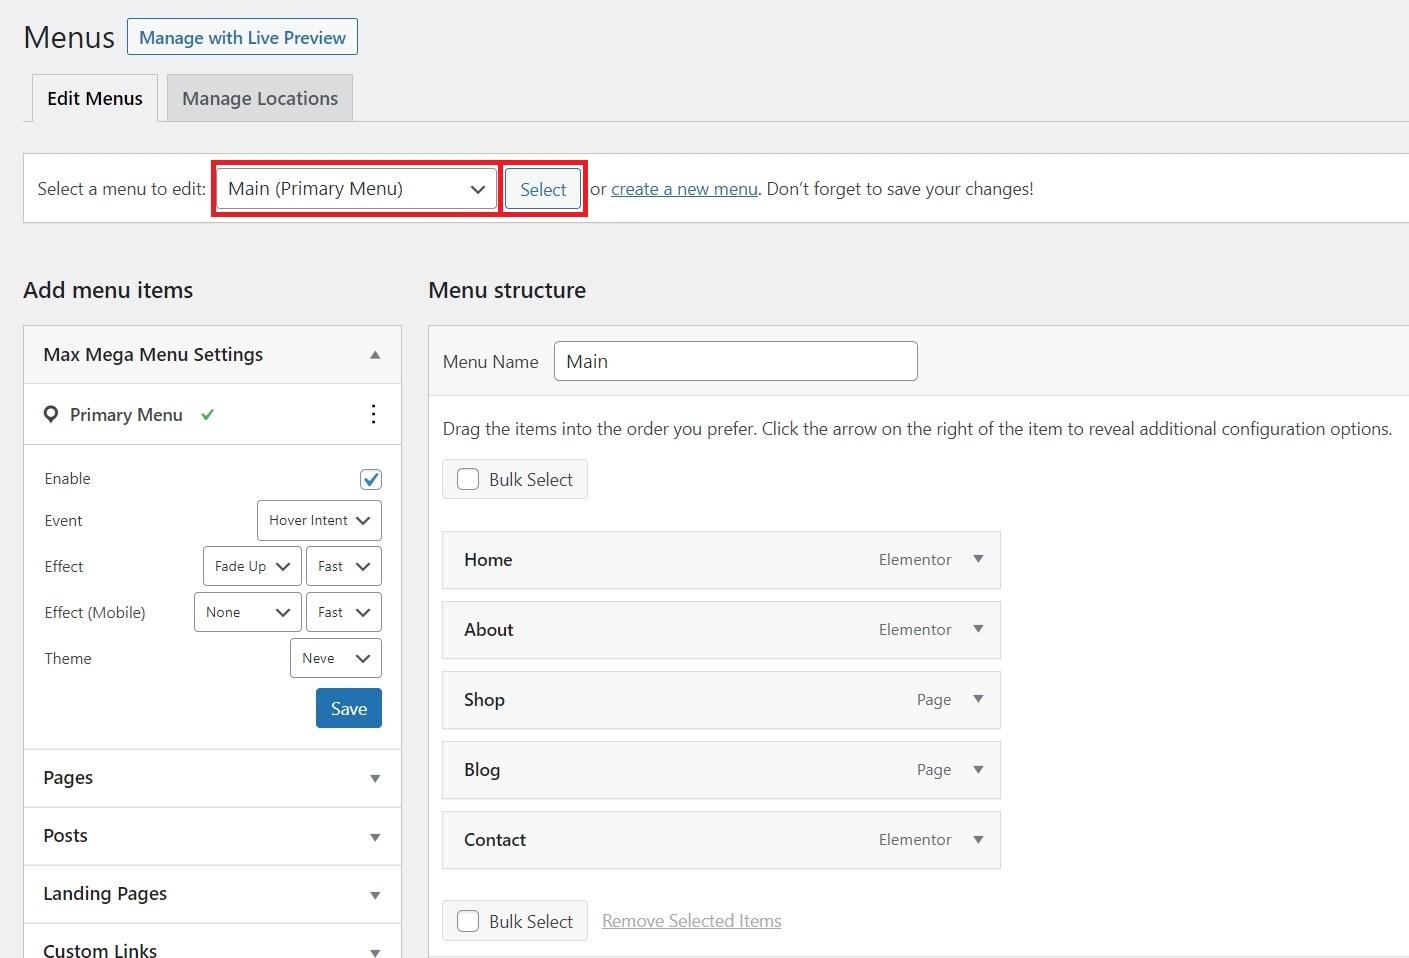
Now, you need to follow Steps #3, #4, #6, and #7 of Method #1 to add menu items and set the menu structure.
Conclusion
Site navigation is an important factor in building visually appealing and accessible websites. For this purpose, using dropdown menus can save space on the site’s header, and give visitors a friendly user experience, while also allowing them to confidently find their way throughout your site, which results in your conversion improvement.
Hopefully, after reading this tutorial, you will find out the best way and practices to design a WordPress dropdown menu for your site.
If you have any further questions and recommendations, please let us know by leaving a comment below.