

A decent header on a WordPress site is essential because it captures the attention of visitors to your site immediately and, if done well, can improve their whole experience. More and more shop owners, however, are focusing less on generic page headers and more on ones that are uniquely theirs. While it may seem daunting at first, with our guidelines, you will complete it within minutes.
In this article, we’ll go over the specifics of how to implement WordPress different headers per page for your online store.
What is a header in WordPress?
Your WordPress website’s header is the first thing visitors will likely see since it appears at the top of every page.
It frequently shows the logo and title of your website, the navigation menus, and other key components that you want users to see first.
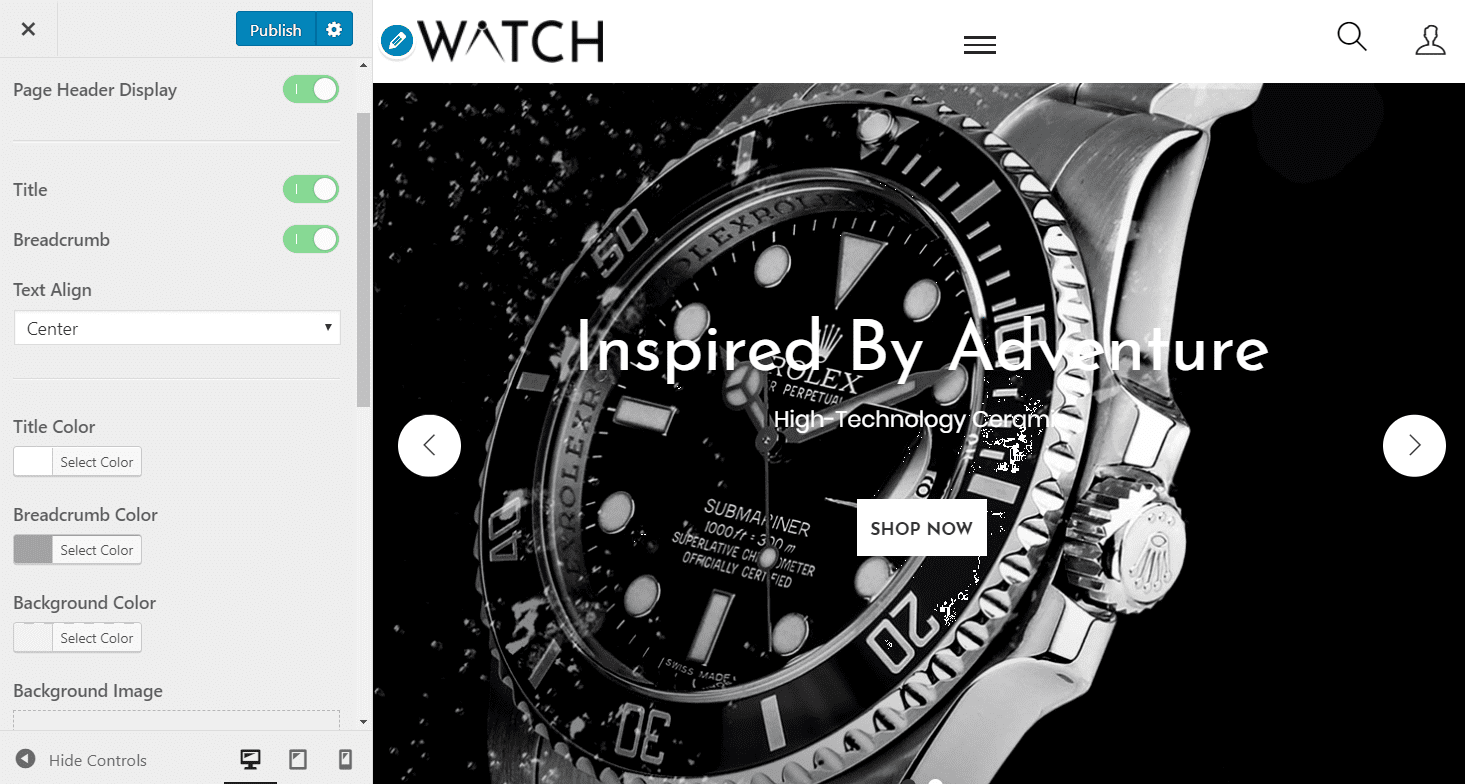
Take a look at our everyday header area on Woostify as a typical illustration.

You may give your website’s header a distinctive look and increase the utility for your visitors by customizing WordPress header. Links to your most popular pages, social media icons, your company’s vanity phone number, and call to action buttons can all be shown to increase conversions. To customize your website header, you can use a WordPress header plugin.
In this tutorial, we are focusing on setting different headers per page in WordPress. Now, let’s getting started!
Why does your store need WordPress different headers per page?
WordPress different headers per page is a feature that allows users to customize headers to be distinct from other pages. A unique header that does its job successfully will not only divide the page into sections, but will also draw attention to the page’s special qualities.
That’s why it’s crucial for your WordPress site to feature unique headers. Additionally, you may tailor your experience by giving each page a unique header. You can change the header’s wording and logo to better appeal to your audience and make a solid first impression on each page.
Although it can be time-consuming to personalize your WordPress different headers per page, it often draws out significant results. From the customer perspective, it allows them to find out more about you and each page’s purpose, and locate the specific material they’re looking for with minimal effort. It can also make up a catchy brand name, throw together a sales page, and use a unique WordPress header on each page of your sales funnel to increase conversions.
Creating a unique WordPress custom header for each page of a site appears to be an arduous undertaking. However, with our step-by-step instructions, it’ll surely be not the case. In fact, with certain approaches, everything is as easy as a few clicks.
How to implement WordPress Different Headers Per Page: 3 Easy Methods
Before even jumping to creating the headers, choosing a header design to utilize is the essential first step. Take a look at the following guidelines and suggestions for creating professional WordPress headers:
- Design the site’s title, description, and logo.
- Compatible with any screen size
- Pick pictures that go with your brand’s aesthetic and each page.
- If you can, use photographs that you have taken yourself to generate a sense of authenticity.
Now, let’s get into implementing WordPress different headers per page. Below are 3 simple approaches (from easiest to hardest) to creating a unique header for each page on WordPress:
- Using Theme Builder
- Adopting plugins
- Manual Method

1. Using Theme Builder
For most online businesses on WordPress, owners would often make use of Theme Builder to get out of some of the major built-in advantages of that theme. Some of the most popular theme builders are WooCommerce (including Woostify), Seed Prod, Template Toaster,… Hence, it typically includes the feature to create WordPress different headers per page.
In this article, we will take the Woostify theme as an example. However, if you use other themes, it will surely be similar to this, and you can always find the instructions on their Theme tutorials.
Step 1: Enable Page Header
If you go to your dashboard and click on Appearance > Customize > Layout > Page Header, a new window will pop up, as shown below.
Step 2: Customize Page Headers
To quickly alter the appearance of your page’s header, simply use the drop-down menus to select a new value for the display option, title, text alignment, background color, image,…
Step 3: Publish to save what you’ve done.
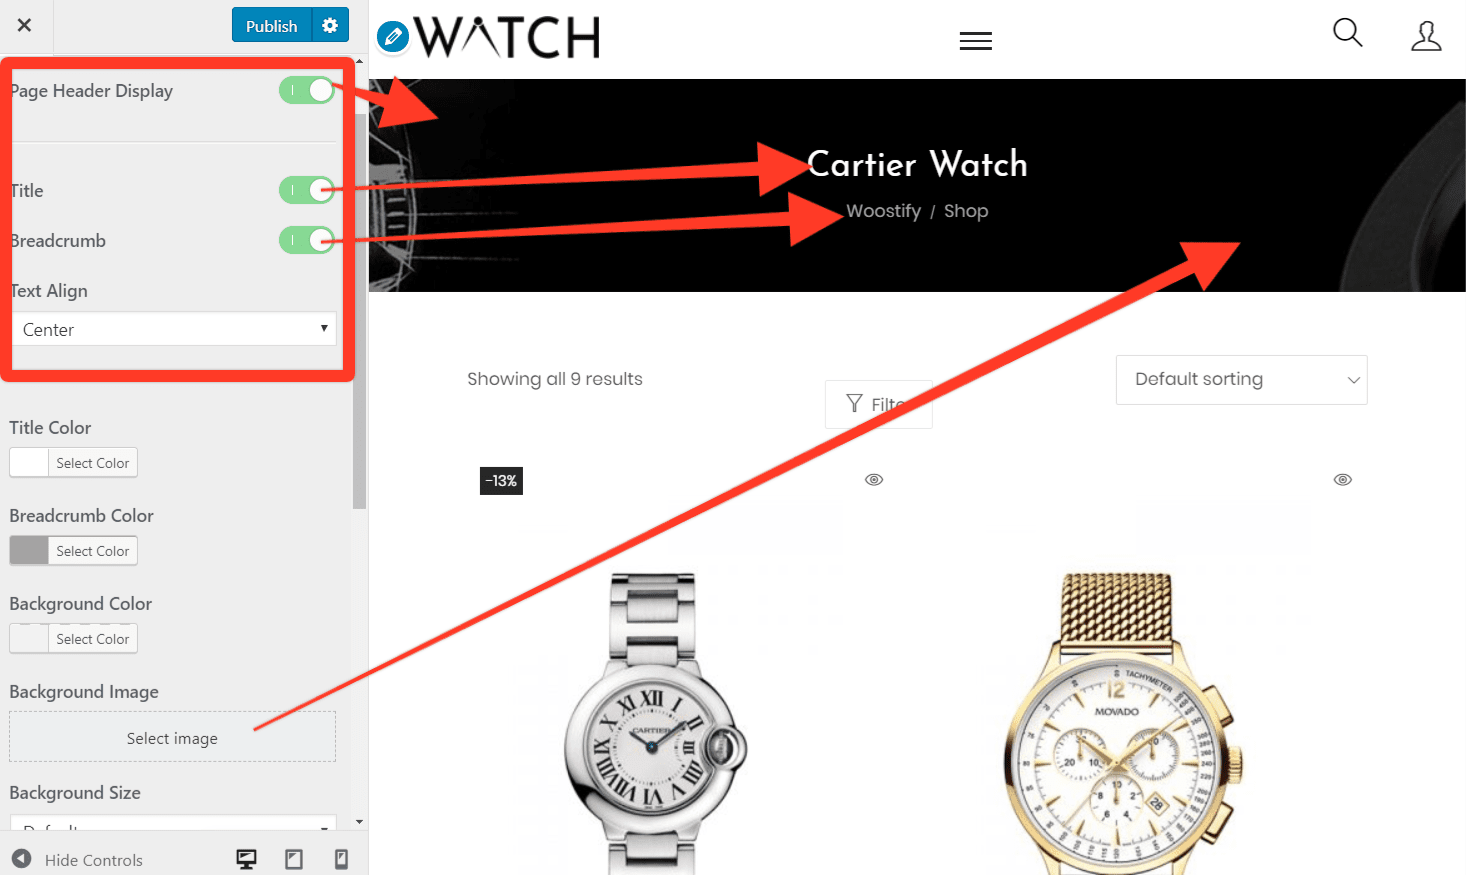
The next step is to update your modification. If you want to update the header of every page on your site, just follow the steps above and then navigate to Pages > All Pages > Watch in the dashboard.
Finally, locate the Page header area under Page settings on the right sidebar. You can now use the same customizer options that you do on other pages. You can also hide the page title in WordPress as well.
2. Adopting plugins
WordPress plugins also allow for a unique header to be shown on each page. Unique Headers, WP Display Headers, Featured Header Images, and many more are just a few examples of the many WordPress plugins available.
Plugins are widely used since they often bring specialized functionality. Using these extensions, you may quickly and easily add new headers to your site, and to each page. The setup and activation of plugins typically made the process to be simple: In less than two minutes, you shall be done.
In our article, we shall use the plugin named “Unique Header“. With this plugin, an additional header image box will appear when you’re editing a post or page. You can have options to either use the same header throughout the site or different ones on each page when editing different pages as well.
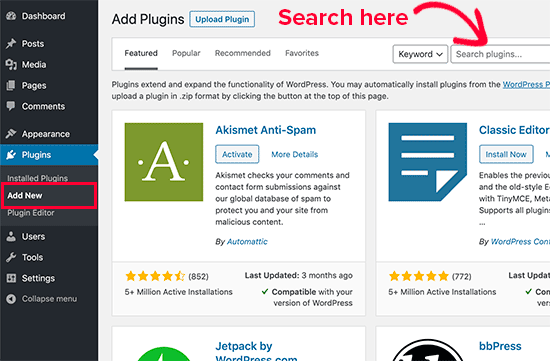
Step 1: Downloading “Unique Header”
Firstly, you need to download the plugin first. Go to Plugins > Add New > Search for “Unique Header” (or any header plugin that you want to obtain). Click “Download” and “Activate” afterward to be able to use it.
Step 2: Utilize the plugin
When you have activated the plugin, just click the “Set Custom Header Image” in the bottom right corner of the screen. Now, you can upload a custom image, and you are done.

Finally, the header will be like this on your front end.

3. Manual Method
On WordPress, headers can be modified through code. Although this is one of the distinct features of WordPress, not many people can perform this as it requires some knowledge of coding. Thus, users without technical backgrounds should avoid this strategy. Directly editing the theme files is not recommended, as even a small error can cause serious issues for your website.
Under Appearance > Theme File Editor in the WordPress dashboard, you’ll find the header files for your theme. Head to the style.css’ template files and edit the header. Then, replace the header code within a page template file (page.php, for example) like below. This allows you to reference unique WordPress headers across several pages.
<?php
if(is_page(about))
{
get_header('about');
}
else
{
get_header();
}
wp_head();
?>
As you can see, the “is_page” function is used to determine if the current page is the “about” page, the preceding code will merely instruct WordPress to use the file header-about.php. Otherwise, WordPress will use the default header file. There, you can modify the site’s look by inserting or removing code in the Site Header.
Conclusion
In this article, we have shown you how to implement WordPress’s different headers per page in a few straightforward steps. You can stay up-to-date and ahead of the game with your online business and see more how-to tutorials like this by subscribing to our email list.
Hi, the method with “Unique Header” does not work at my page 🙁