

When setting up a WooCommerce store, you need to decide what payment gateway to use. So you can receive payments from your customers for the items you sell.
Also, your customers should be able to pay seamlessly. If the process is too complicated, they may abandon their cart.
There are many payment gateways you can choose from. This article will focus on Amazon Pay—a popular payment gateway for WooCommerce stores. You may have already used it before without noticing.
Continue reading to learn everything about WooCommerce Amazon Pay: what it is, why you should use it, and how to set it up.
What is Amazon Pay?

Amazon Pay is a great online payment solution developed to offer shoppers more ways to buy the things they want.
When completing a transaction on your WooCommerce store using Amazon Pay, your customers will enjoy a straightforward online checkout experience.
WooCommerce Amazon Pay is very popular because—just like WooCommerce Apple Pay—it is quick to sign up and integrate it into online stores. You do not have to list your products on Amazon. You just need to have an Amazon Pay merchant account to use it.
However, we recommend listing your items on both the Amazon website and your WooCommerce store if you use Amazon Pay. It is a great but simple way to attract more customers.
In addition, WooCommerce Amazon Payment has a reliable and comprehensive guarantee. Your customers can save even more time if they have already provided their shipping and payment details to Amazon.
5 Reasons Why You Should Integrate Amazon Pay into Your WooCommerce Store
According to Amazon’s report, 91% of users are somewhat or very likely to use Amazon Pay again if given a chance. So what are the reasons? Here’s why:
- User-friendly interface: Shoppers can quickly complete payments anytime, anywhere, in just a few clicks.
- Credibility: Amazon is a trusted international brand. There is a great degree of trust involved in Amazon Pay. That trust extends to businesses that accept it as a payment option. In other words, implementing Amazon Pay is a quick way to build trust with your customers.
- Security: Shoppers do not want to give out their credit card details on numerous websites. However, most people have already given it to Amazon.
- Fast transaction processing: Shoppers will no longer have to provide credit card and shipping details whenever they want to make a transaction.
- Multi-currency support: As a result, shoppers can avoid incurring currency translation costs from their banks.
How to Add Amazon Pay to WooCommerce Stores?
Now you know how much shoppers prefer Amazon Pay. Let’s talk about the WooCommerce Amazon Pay integration process:
Ensure Your WooCommerce Store Meet the Requirements
Before you get started, you should know about the requirements of WooCommerce Amazon Pay.
Unfortunately, for now, this service is only available to businesses in specific countries. Therefore, if your brick-and-mortar store’s address is not on the list below, you cannot use Amazon Pay.
- Austria
- Belgium
- Cyprus
- Denmark
- France
- Germany
- Hungary
- Ireland
- Italy
- Japan
- Luxembourg
- The Netherlands
- Portugal
- Spain
- Sweden
- The United Kingdom
- The United States
In addition, your WooCommerce store must have an SSL certificate to register for an Amazon Pay merchant account.
Install the WooCommerce Amazon Pay Plugin
If your online store meets all the requirements, it is time to download the WooCommerce Amazon Pay plugin.
- Go to the Plugin > Add New page from the WordPress dashboard.

- Enter ‘WooCommerce Amazon Pay’ into the search box to find the plugin.
- The plugin should appear in the first position. You just need to click the ‘Install’ and then the ‘Activate’ button.
Create an Amazon Pay Merchant Account
- Now, go to the WooCommerce > Settings page from the WordPress dashboard. Then switch to the ‘Payments‘ tab. Here, you can see a toggle to quickly enable or disable Amazon Pay.

- Click the Set up button. You will be redirected to a new web page to specify some necessary information regarding your WooCommerce store.
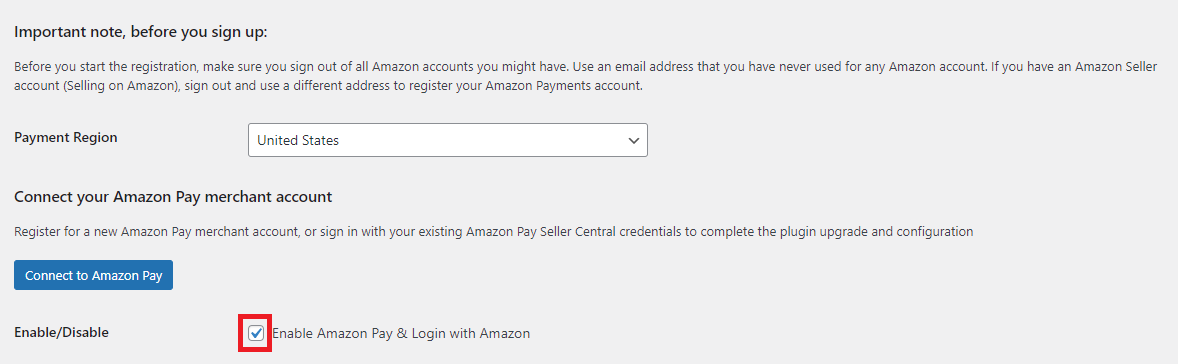
- Firstly, select your brick-and-mortar store’s region in the Payment Region drop-down menu.
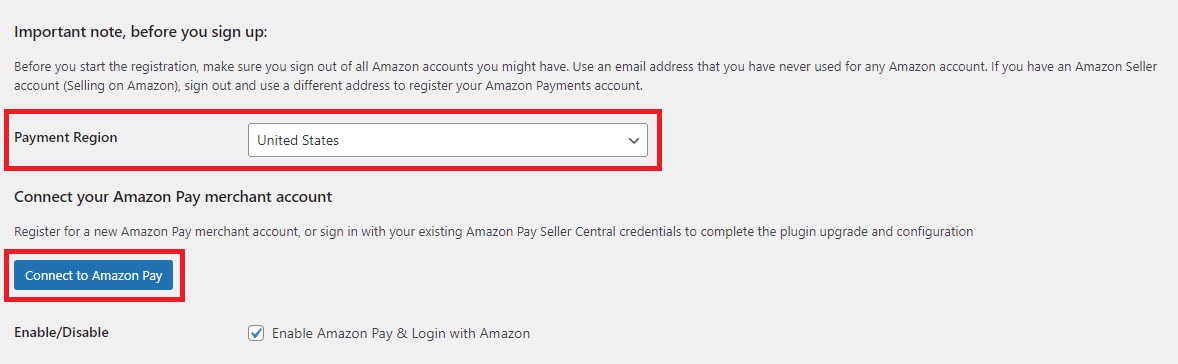
- After that, click the Connect to Amazon Pay button to go to the Amazon Pay Merchant registration web page.
- Here, you will be asked to provide your business name, website URL, business category, business address, tax ID number, tax mailing address, payment information, and more.

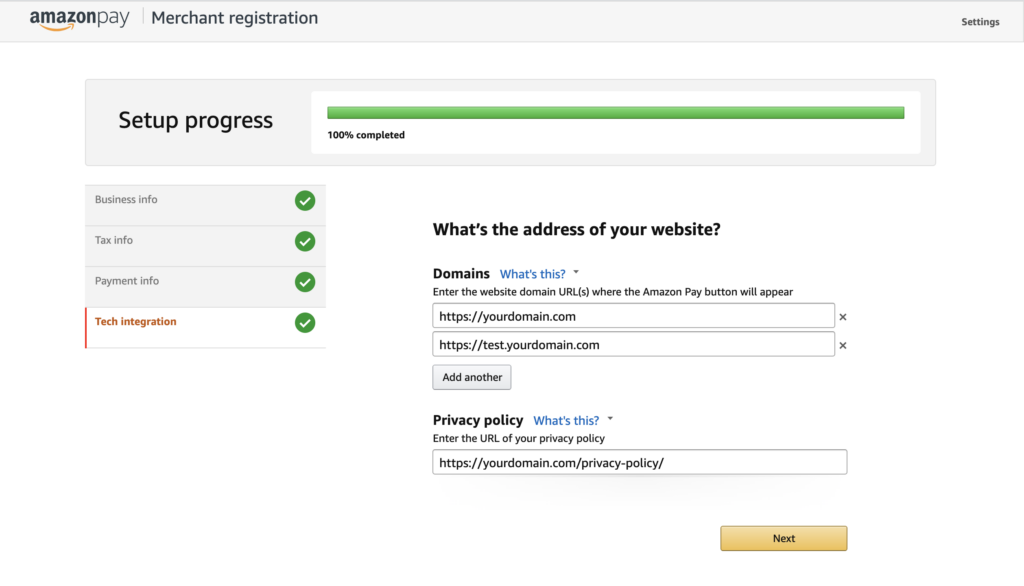
- Once on the Technology integration tab, enter your website domain and your online store’s privacy policy page.
- At the end of the setup process, click the ‘Transfer Access Key’ button to transfer your Amazon Payments credentials to your WooCommerce store.
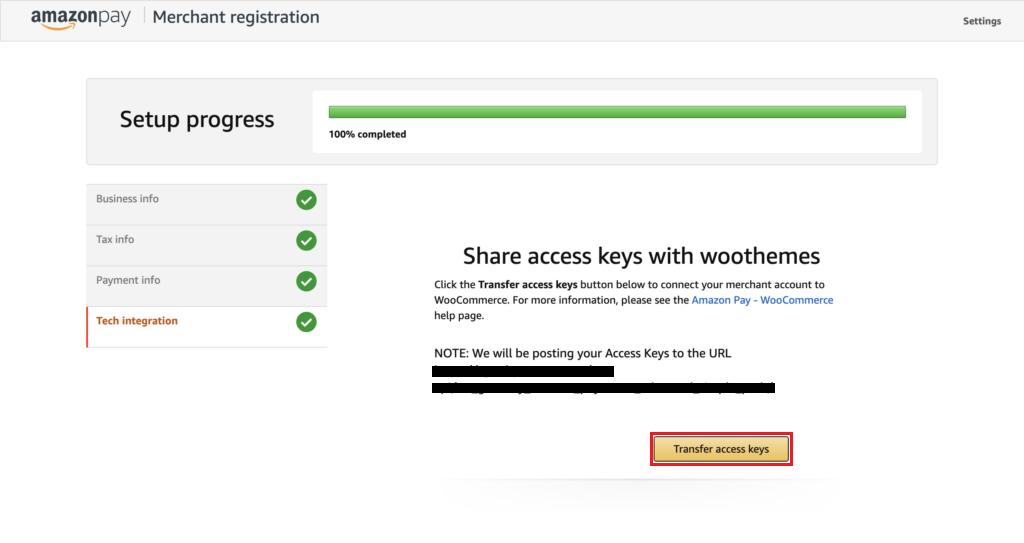
You will be navigated back to the Amazon Pay setup page with these fields being filled in:
- Lastly, tick the ‘Enable Amazon Pay & Sign in with Amazon’ checkbox and save the changes.
Configure WooCommerce Amazon Pay to Fit Your Needs
Let’s explore some settings you can change quickly on the Amazon Pay setup page to make it work better with your WooCommerce store. However, please note that you do not need to mess with these settings most of the time.
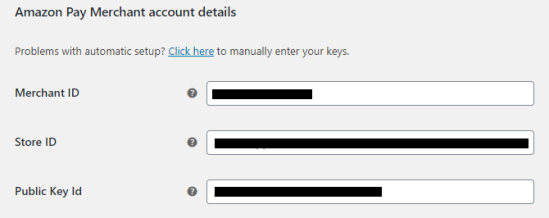
Amazon Pay Merchant Account Details
These are where the Amazon Pay merchant account details transferred in the previous step are displayed. Do not change the values of these fields unless you need to modify the account used on your WooCommerce store.
Advanced Configurations

- Payment capture: This setting allows you to define how the payments will be processed. There are three options to choose from:
- Authorize and Capture: Complete authorization and record the order when it is placed.
- Authorize: Only complete payment authorization when an order is placed. Capture will need to be manually triggered at a later time.
- Don’t Authorize: This option will not trigger any payment when an order is placed. The order will only be confirmed. Choose this only if you need to handle long-term pre-orders.
- Authorization processing mode: This setting allows you to define how the Amazon Pay API will return a response to your WooCommerce store regarding the authorization results.
- Synchronous: This is the default and recommended processing mode. The payment results will be available immediately.
- Asynchronous: Amazon Pay API will return a pending response in some cases. Use this mode only if you are selling very high-value products. Please note that this mode cannot be set if the Payment capture option is set to ‘Authorize and Capture.’
Display Options

This is where you customize the Amazon widgets’ appearance:
- Button language: Pick the preferred language for Amazon Pay checkout here. This will change the language of the label displayed below the Amazon Pay button and the entire Amazon Pay experience, including emails sent from the Amazon Pay side.
- Button color: There are 3 options: Gold, Light Gray, and Dark Gray.
- Standard checkout button: Tick this checkbox to hide the standard checkout button on the cart page. Amazon Pay will be the only payment option in this case.
Miscellaneous

- Debug: Tick this checkbox to enable logging API events on your WooCommerce store.
- Hide Button Mode: Tick this checkbox to allow the module to remain active without having to show the Amazon Pay button to your customers. You should only use it if you are testing the solution before releasing it.
Some Common Issues with Amazon Pay on WooCommerce
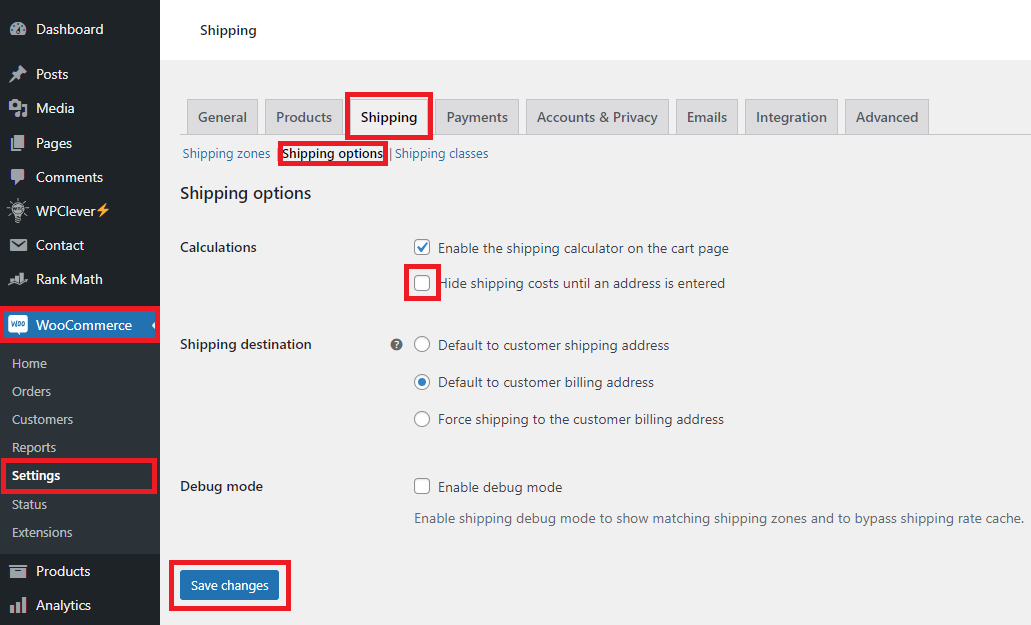
Shipping costs are missing.
This can happen if the ‘Hide Shipping Costs‘ option is enabled. Disabling it will solve the issue. Just go to the WooCommerce > Settings page from the WordPress dashboard. After that, switch to the Shipping and then the Shipping options tab. Untick the checkbox and save the change.
The ‘The above fields are required’ Error.
This is usually caused by the ‘Company Name‘ or ‘Address Line 2‘ fields as required. Please navigate to Appearance > Customizer > WooCommerce > Checkout. Once there, set these two fields to ‘Hidden‘ or ‘Optional.’

WooCommerce Amazon Pay: FAQs
Can I Use WooCommerce Amazon Pay with WooCommece Subscriptions?
WooCommerce Amazon Pay supports recurring payments with WooCommerce Subscriptions (purchased separately). However, the totals cannot be modified.
What Languages is the WooCommerce Amazon Pay plugin Available in?
The WooCommerce Amazon Pay plugin is available in:
- Japanese
- Spanish
- French
- German
- Indonesian
- Italian
- English
Why is My Amazon Pay Button Greyed out?
The Amazon Pay buttons on your website will be grayed out if your Amazon Pay merchant account is in the ‘suspended’ status. As a result, your customers cannot use this payment method.
You need to log into the Seller Central page and follow the prompts to fix your account or contact the support team for assistance. The button will be reactivated once your account functions normally again.
Final Thoughts
Amazon Pay is undeniably one of online shoppers’ most favored and trusted payment methods. Using it as one of your WooCommerce store’s payment gateways will undoubtedly provide a better shopping experience for your customers. As a result, it will be more beneficial for your business in the long run.
Therefore, we hope you now understand WooCommerce Amazon Pay better. If you still have unanswered questions, feel free to drop them down in the comments section below.