

Transparent headers can be a great way to improve your site’s appearance. It makes your website design stand out and look more interactive to your site’s visitors.
But can you use Elementor to create a transparent header on WordPress without knowing any programming language? The answer is yes! You definitely can. This article will show you the instructions to create an Elementor transparent header easily.
The Advantages of Using Transparent Headers

You can easily create engaging Elementor transparent headers. But if you want, you can go a step further and make it fixed as the visitors scroll through the page content. Below are the advantages:
Excellent for Long Web Pages
Using a transparent sticky header is a stylish and fast way to ensure your visitors have a pleasant experience.
They can help your website have a more user-friendly navigation system. If your site’s content is very long, this benefit will be very beneficial.
Best for Actionable Websites
Transparent sticky headers work best on actionable websites, such as retail or eCommerce sites. It’s because you want the visitors to take a specific action while still on the page content.
When the header is beautifully shown while browsing through your website, the visitors will find it more convenient to explore.
What’s more, since the header is transparent, it won’t reduce the content’s readability. Therefore, adding a transparent header may reduce your site’s bounce rate and help guide your visitors efficiently.
Improve Your Site Navigation Capability
Using a transparent sticky header on your site encourages your visitors to take immediate action. It saves them time when searching for a particular option.
And instead of putting your brand’s logo everywhere on the homepage, you can elegantly display it on a transparent sticky header.
How to Use Elementor Pro to Create a Transparent Header?
Now, let’s learn how to create and customize a transparent header using Elementor Pro.
Install and Activate the Elementor Pro Plugin
If your site hasn’t had Elementor Pro yet, you need to install and activate it.
- From the WordPress dashboard, go to Plugins > Add New.
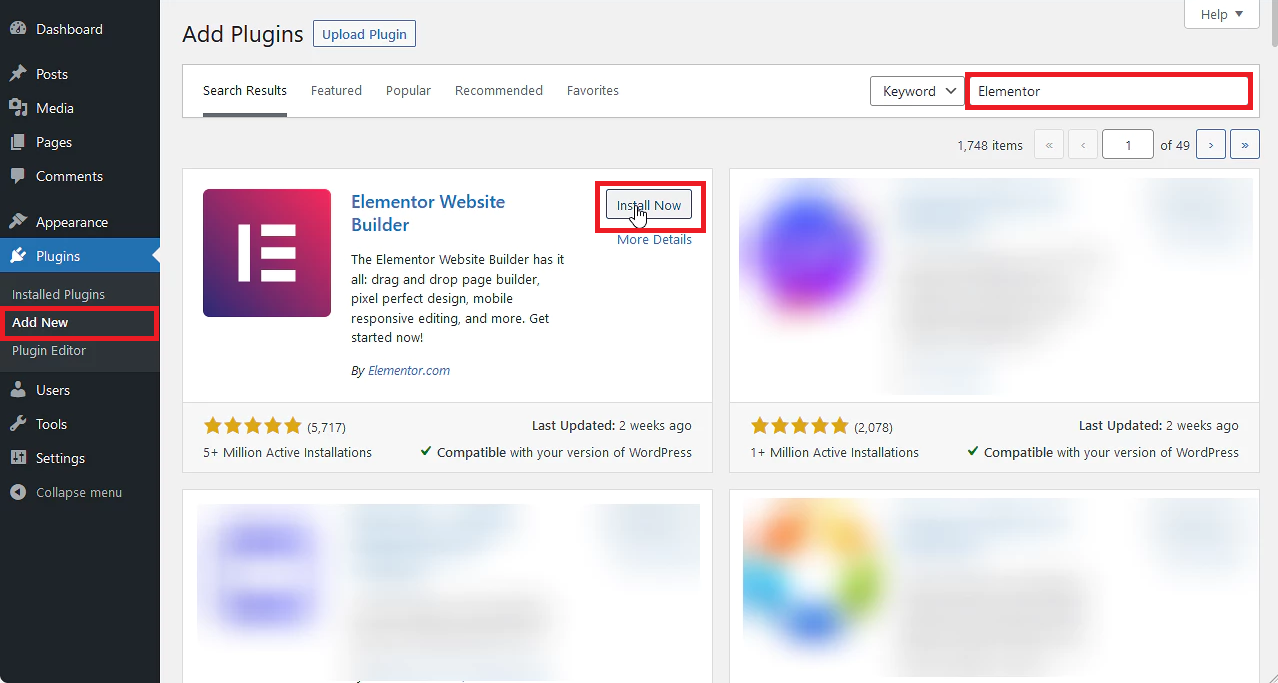
- Find the plugin by entering ‘Elementor’. You will then see the Elementor Website Builder listed as an option.
- Click the Install Now button and the Activate button, respectively.
- After buying Elementor Pro successfully, go to my.elementor.com.
- Log in with the information you got in the email after purchase.
- Next, you’ll be taken to the Profile page. Click on the Download Plugin button in the upper right corner to download the .zip file to your computer.

- From your site’s WordPress dashboard, click on Plugins > Add New. Then, click on the Upload Plugin button in the upper left corner.
- Click on the Choose File button. Select the .zip file you just downloaded. Next, click Activate.
- On top of the site’s dashboard, you’ll get a notification requesting you to activate your license key.
Create a Menu for Your Site
Next, you have to create a header menu using the WordPress dashboard if you haven’t done it yet. Below is an introductory guide.
- From the WordPress dashboard, navigate to Appearance > Menus.
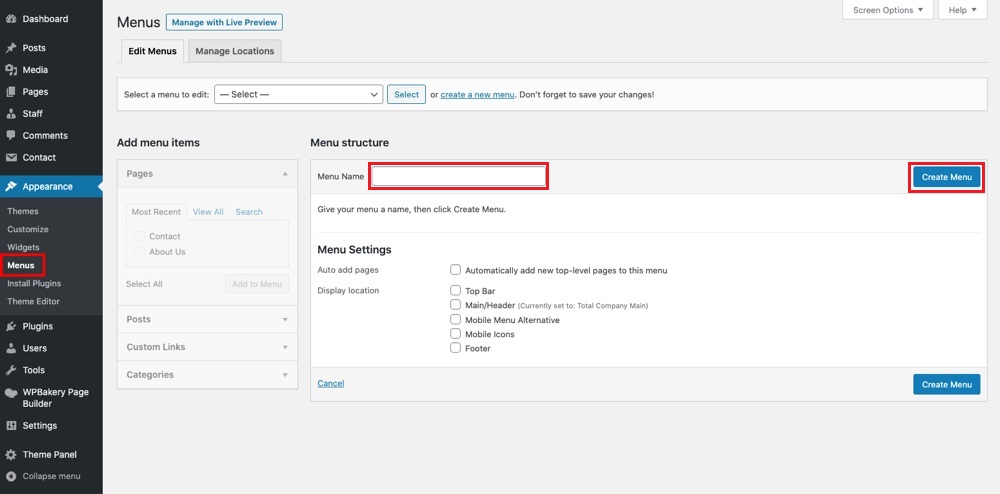
- Enter the menu name in the Menu Name textbox. Then, click on the Create Menu button.
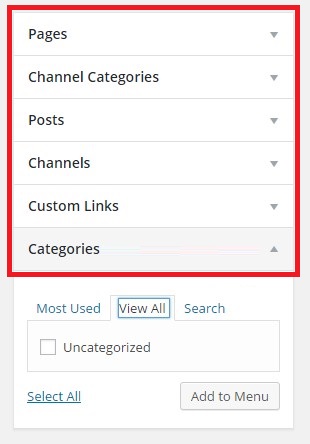
- Focus on the left panel. Here, you can add the site’s pages, posts, categories, and custom links to the menu.
- You can drag and drop menu items to rearrange them or create sub-menus on the right panel.

- When you’re happy, remember to click on the Save Menu button.
Use Elementor Pro to Create a Normal Header
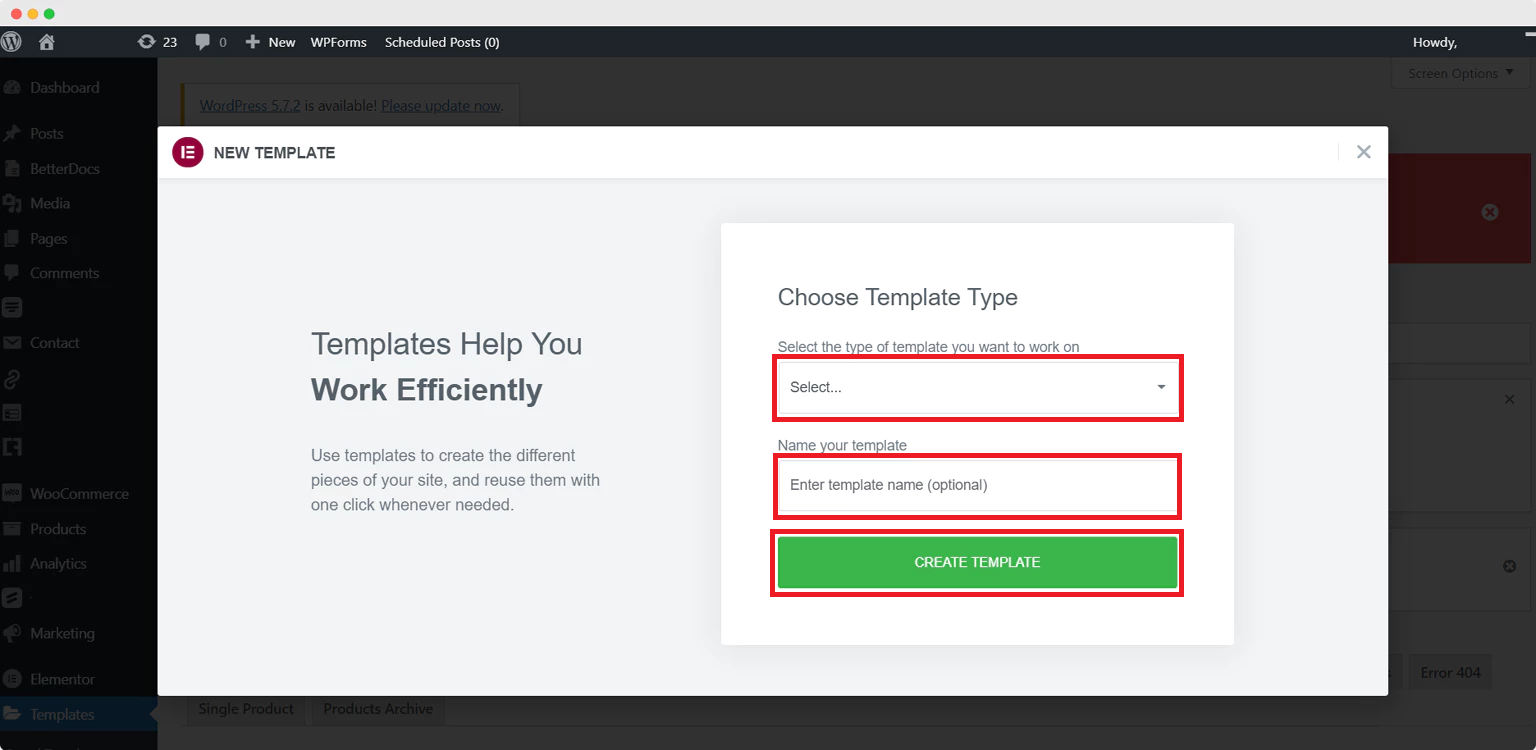
- Go to Templates > Add New from the WordPress dashboard.

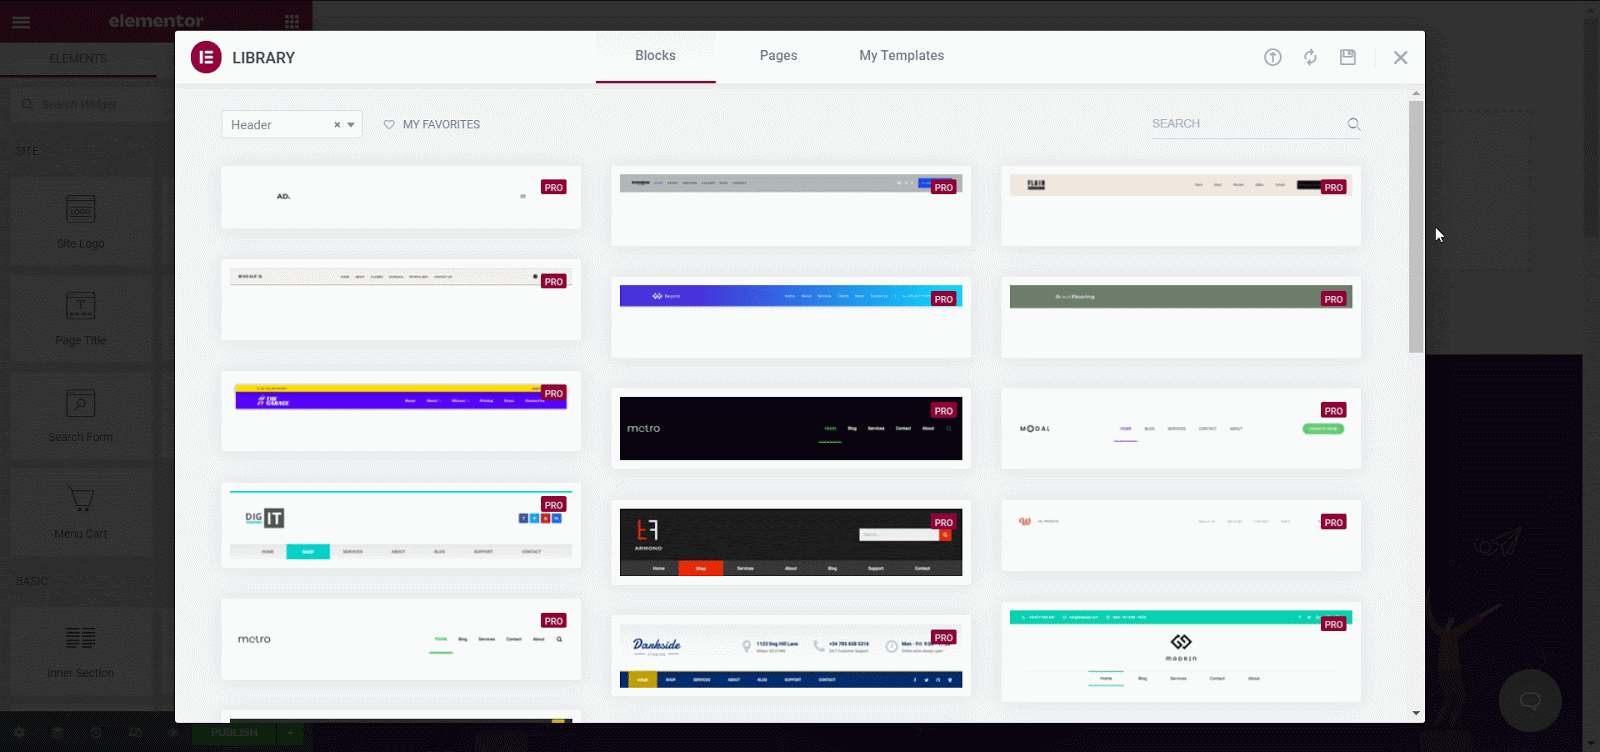
- A pop-up window will appear. Select the Elementor header template from the dropdown menu and enter its name in the Name your template textbox. Then, click on the CREATE TEMPLATE button.
- The Elementor Template Gallery will appear in a pop-up. You can navigate through all the Elementor header styles. Once you’ve chosen a favorite, move your cursor to it and then click on the Insert button. You can also preview all of them.
Create a Transparent Sticky Header Using Elementor Pro
- Now, you need to make the header transparent using Elementor Pro. To do so, click on the six-dot button above the header.

- In the ‘Layout’ section, choose the menu you want in the Menu drop-down menu.

- Go to the Style tab to change the header’s background color and transparent value. In the ‘Background’ section, choose the Classic background type (indicated by a paintbrush).

- Click on the Color Picker button. Then, pick a color and transparent value you want.
- You can further change the overall look of the header, including typography, background overlay, border, and divider. Feel free to experiment.
- Next, go to the Advanced tab. Then, scroll to the Motion Effects section. Enable the Scrolling Effects option.

- Choose the Entire Page option from the Effects Relative To drop-down menu.
- Finally, choose the Top option from the Sticky drop-down menu.
- When you’re happy, click on the Publish button to apply the changes.
The result will be similar as below:

How to Use Elementor to Create a Transparent Header for Free?
If you’re low on budget and don’t want to spend money on Elementor Pro, you need another plugin to create transparent headers.
In this article, we’ll use the Essential Addons for Elementor plugin. This is the most popular widgets library with over one million active users.
You’ll get many widgets for free to make a website stand out and be as engaging as possible. Note that you don’t need the premium version to create transparent headers.
Install and Activate the Elementor and Essential Addons for Elementor Plugin
- From the WordPress dashboard, go to Plugins > Add New.
- Find the plugin by entering ‘Elementor‘. You will then see the Elementor plugin listed as an option.
- Click the ‘Install Now’ button and the ‘Activate’ button, respectively.
- Repeat the above process with the Essential Addons for Elementor plugin.
Create a Menu for Your Site
We already covered this above. Please scroll up to know-how.
Use Essential Addons for Elementor to Create A Transparent Sticky Header
- Navigate to Essential Addons > Elements. Here, activate the Simple Menu widget. Remember to click on the SAVE SETTINGS button.

- Create a new page/post or open an existing one with Elementor.
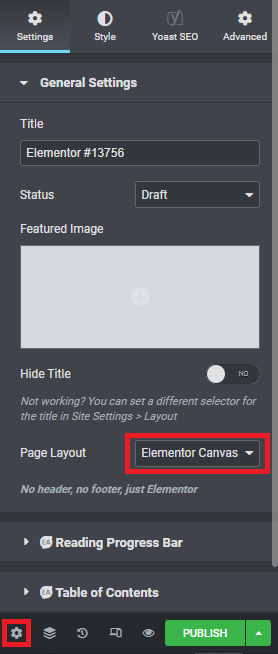
- Click on the Settings button (indicated by a gear) in the bottom left corner. Select the ‘Elementor Canvas’ in the Page Layout drop-down menu. This way, you can get rid of the header that comes with the theme.
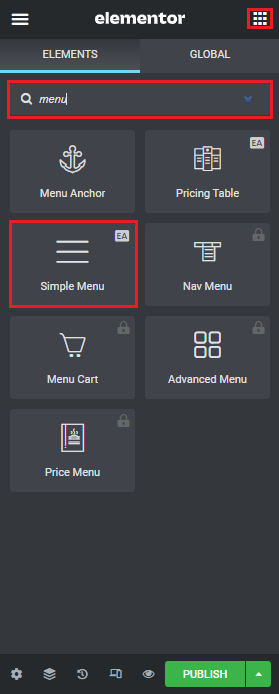
- Go back to the widget menu by clicking on the nine-square icon. Search for the Simple Menu widget. Drag and drop it to the desired location.
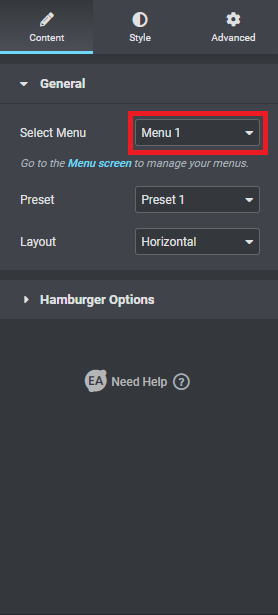
- In the General section, choose the menu you want in the Select Menu drop-down menu.
- Go to the Style tab to change the header’s background color and transparent value.
- In the Background section, choose the Classic background type (indicated by a paintbrush).
- Click on the Color Picker button. Then, pick a color and transparent value that you want.
- You can further change the overall look of the header, including typography, background overlay, border, and divider. Feel free to experiment.
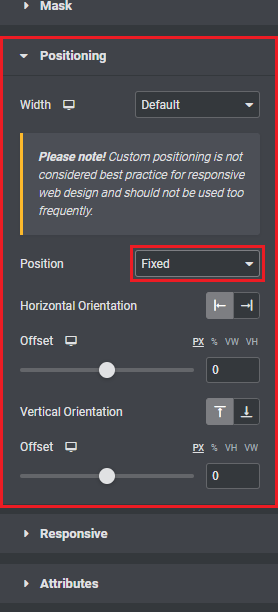
- Next, go to the Advanced tab. Then, scroll to the Positioning section. Choose the Fixed option in the Position dropdown menu.
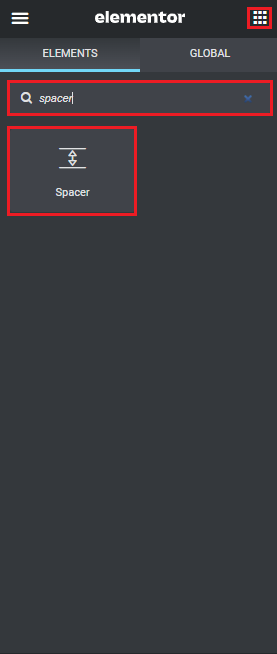
- Go back to the widget menu by clicking on the nine-square icon. Search for the Spacer widget. Drag and drop it right below the Simple Menu widget.
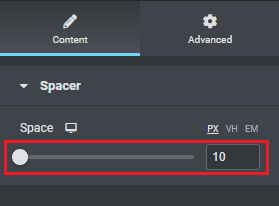
- In the Spacer section, adjust the Space value to match the header’s height.
- When you’re happy, click on the Publish button to apply the changes.
How to Create a Transparent Header for Woostify Users?
If you’re using the Woositfy theme, even the free version, you can quickly apply a beautiful transparent header for your entire site within minutes. Follow the instructions below to know-how:
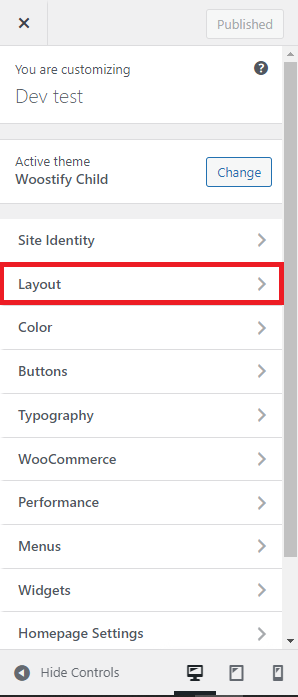
- Navigate to Appearance > Customize from the WordPress dashboard.

- Then, go to Layout > Header Transparent.
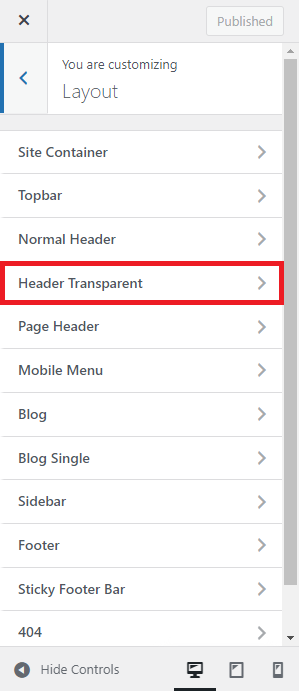
- Switch the Enable Transparent Header toggle on.

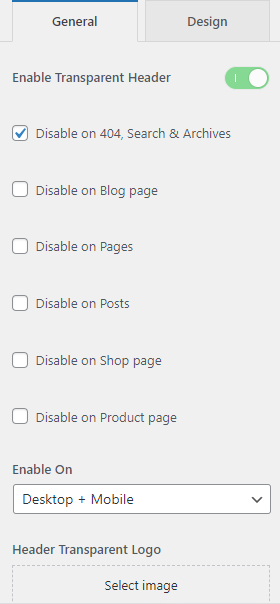
- In the new General and Design tab, you can customize the new transparent header according to your needs. For example, you can enable/disable it on particular pages, such as 404, posts, etc.,

- Don’t forget to click on the Publish button when you’re happy with the result.
Final Words
Creating an Elementor transparent header is a stylish approach to help users navigate your site.
The header we created is fully responsive. Therefore, you don’t need to worry much about this problem. For those who are using Woostify, you should go for the third way. It is also the most simple and fastest way when you want to create a beautiful transparent header.