

- What is a Thank You page in WooCommerce?
- The Default WooCommerce Thank You Page
- Why customize WooCommerce Thank You pages
- How to customize Your Thank you page in WooCommerce
- What you should do for a powerful Thank You page
- In conclusion,
There is an obvious fact that whether you are the owner of a traditional or online store, it is crucial to say “thank you” to your customers. If the customers feel satisfied with your nice thankful message, they will most likely come back to your store for another purchase or share the services they have bought from your store with their family and friends. Wow, that means you have gained free marketing from your own customers. Sound great, right?
If you have a WooCommerce store and desire to boost sales, then it is necessary to consider the importance of WooCommerce Thank You Pages. This is also the reason why we are here to help you understand Thank You Pages to the fullest.
Before digging into features, functions, and customization, we first give you a clear definition of WooCommerce Thank You Pages.

What is a Thank You page in WooCommerce?
WooCommerce Thank You Page, also sometimes called Order Received Page in WooCommerce, is the page that your customers will see after form submission. The Thank You page URL has the default format of …/checkout/order-received/…
As normal, no matter which product your customers have ordered, WooCommerce will redirect them to the same Thank You page. But for some reason, many more store owners tend to create custom Thank You pages per product in their WooCommerce stores.
Now, spend moments taking a glance at a default WooCommerce Thank You page built with Elementor.

The primary function of a default WooCommerce Thank You page is to thank your customers and show the details of the order that they have taken before that. As the picture shows, you can see that it often consists of four main parts, including:
- Thank you message: first of all, send the thank you message to your customers for placing the order from your store. It is often “Thank you. Your order has been received.”
- General information: after saying thank you, the page shows the order number, order date, email, total price, and payment method.
- Order details: this part includes products’ names, specific prices of every product, shipping fee, payment method, and total price.
- Address: it is where the billing and shipping addresses of the customer are displayed.
In addition to these default elements, you can add some other interesting parts by customizing your WooCommerce Thank You page:
- Notification of what will happen next: for example, you can tell them that a confirmation email or phone call is coming. Or let them know about the status of their order, “Your order is being processed. You will receive a confirmation email soon.”
- Call to action: It is the most useful part where you find a way to encourage your customers to do what you expect for the website. For example, introduce them to popular blog posts on the website, redirect them to a special offer, related products or services, or ask them for some social shares.
In general, with a custom Thank You page, there will be many things to do on it. In this way, you will have high-converting thank you pages instead of regular Thank You pages in WooCommerce.
The Default WooCommerce Thank You Page
The look and feel of your WooCommerce thank you pages may vary based on the theme you are using. It can even use custom ones already. However, below is a classic example of a default WooCommerce thank you page.
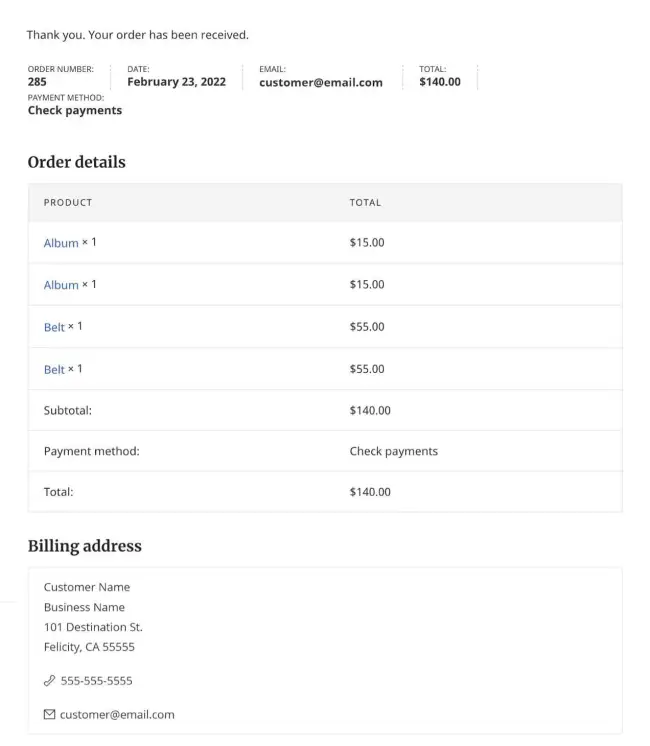
As you can see, the content is pretty basic. By default, the order number, date, customer email, total amount, payment method, products purchased, and payment information are included.
Why customize WooCommerce Thank You pages
As mentioned above, a WooCommerce Thank You page comes to confirm a completed order and provide customers with basic order information while they are waiting for their order to be done.
A default page like this almost focuses on letting customers see what they already know but it makes customers feel secure that your store collects and provides the right information.
However, apart from this basic function, a Thank You page can offer you more. What are they?
With some customization, you can add some elements to make the Thank You page work more effectively. In this way, you will turn your WooCommerce Thank You page into an attractive custom Thank You page that can be used as a marketing tool to build trust, increase customers’ engagement, and boost sales.
Build trust with your customers
You wonder how thank you pages can help you build trust. We can claim that they can do it, even do it very well. Therefore, don’t create an emotionless thank you page so that your customers completely ignore it.
Building up confidence is a process, not a step.
What you need to do is to make customers trust your brand and use your services. Once the customers reach Thank You page, many people immediately think that they already completed their task – making customers buy a product.
The fact is far different from what they have thought. Until this step, they still must continue to nurture the relationship with customers to start a new sales cycle.
Social proof is seen as one of the powerful types of content that will support you a lot in building trust. Some testimonials from happy customers will draw the attention of the customers.
When seeing those positive reviews and feedback on the page, they will feel more secure that their purchasing decisions are right.
After earning their trust in your services and brand, you can live in the hope that they will take more actions on your store.
Offer repeat conversions
Your customers have submitted your website’s form and completed the order. Yeah, it’s great. But you think that everything is done here? Not really.
Although Thank You Page is the final conversion stage, you can take advantage of it to build a new conversion funnel. More specifically, with a great custom thank you page, you can turn your existing customers into long-term ones who will buy more and more products of your store.
The Thank You Page is where you can show promotional programs, special offers, or other services. But keep in mind that all these things should be relevant to the products your customers have ordered.
In reality, many marketers today still keep the thought that the only way to help them generate profits is getting more and more new customers.
Therefore, they become neglectful of taking care of existing customers. They have not been aware that maintaining the relationship with the latter ones will most likely bring their business a huge benefit.
Turn your customers into promoters
We still tell the story about the existing customers. After the process of building trust and getting long-time customers, it is time to make them become part of your marketing strategy. So how can you do that?
It is not a daunting task. You need to know how to add value to your WooCommerce custom thank you page. Social share buttons are an important element you should consider when designing the page.
In recent years, Nielsen’s latest Global Trust in Advertising reports have shown that over 92% of users believe the recommendations from their friends and family. Pieces of advertising on Facebook may be attractive to users, but credibility is the factor most affecting their purchasing decision.
Amazon, the largest online store in the world, has been successful in developing countless marketing strategies. And encouraging social sharing is one of their marketing tips. Amazon, together with many other famous retailers around the world, puts social sharing links on their thank you pages.
After some happy customers share their purchases on Facebook or Twitter, it is quite likely that they will bring several potential customers to your store.
In short, for a perfect marketing strategy, there are dozens of things to do with a custom Thank You Page. So now, come to the part of the instructions on setting up a customized thank you page in Woocommerce. Let’s go!
How to customize Your Thank you page in WooCommerce
When having a custom Thank You page for your WooCommerce store, you can add lots of useful elements such as social share buttons, WooCommerce recommended products, custom content, and many others.
In this part, we will give you some ways to perform this task. There are several methods to add new value to your Thank You page. In general, you can customize these pages by:
Using Woostify theme
Woostify is a free WooCommerce theme with basic features. But this theme also has a pro version that is upgraded with the add-on called WooBuilder. If you come to Woostify theme pro, you can use WooBuilder to:
- customize WooCommerce single product page,
- set up WooCommerce shop page,
- edit WooCommerce cart page,
- create custom WooCommerce checkout page,
- design WooCommerce my account page,
- build custom thank you pages for WooCommerce
Especially for Thank You pages, WooBuilder offers a wide range of customization options. Only with drag and drop, you can build a Thank You page full of necessary elements like order overview, order details, shipping address, and billing address.
What’s more, to help you increase the sales conversion rate, this WooCommerce page builder provides many other adding options such as images, videos, social sharing buttons, and Google Maps.
Using a plugin
Both free and paid plugins are available now to help you with this customization. Every kind has its own advantages and disadvantages, but in general, the paid versions, of course, will offer more functionalities. Below are the top 3 best plugins to customize WooCommerce thank you pages in our opinion.
NextMove Lite – Thank You Page for WooCommerce
- Price: Free (paid version available)
- Rating: 4.6/5 (110 reviews)

NextMove Lite is a powerful free option to customize your WooCommerce thank you pages.
You can choose between various elements to include in your WooCommerce thank you pages, like order details, location maps, and more.
Finally, you can customize the display of the thank you page based on the customers’ purchase history.
Highlight features:
- Extensive customization options.
- Support shortcode.
- Compatible with popular page builders.
- Can redirect to a custom page.
YITH Custom Thank You Page for WooCommerce
- Price: €79.99/year
- Rating: 4.5/5 (58 reviews)
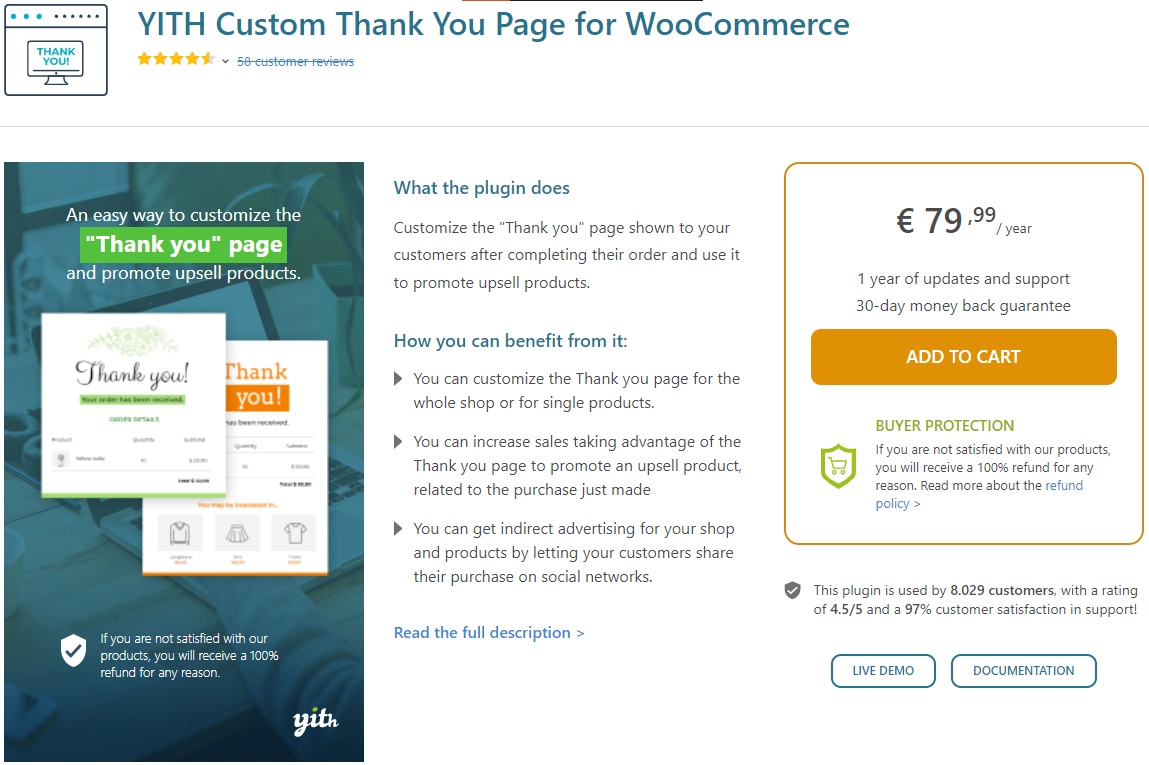
This plugin allows you to customize the global WooCommerce thank you page or create separate thank you pages for particular products.
You can use this plugin to encourage your customers to share product information on their social networks. The options available are Facebook, Twitter, and Pinterest.
In addition, the plugin provides the options to configure specific thank you pages based on categories and set the priority when multiple products are purchased.
Finally, you can display product recommendations on your WooCommerce thank you pages.
Highlight features:
- Create global WooCommerce thank you pages or specific ones for products and categories.
- Share product information on popular social media platforms.
- Have the option to set display priority when multiple products are in customers’ orders.
- Extensive customization options.
Thank You Page Customizer for WooCommerce
- Price: Free (paid version available)
- Rating: 4.5/5 (33 reviews)

This is another simple yet powerful plugin to help you customize your WooCommerce thank you pages. You can do so using different components, like messages, coupons, social media, etc.
In addition, the plugin also offers the option to personalize the design and layout of its components.
Highlight feature:
- Customize WooCommerce thank you pages with different components.
- Support video, maps, social media share buttons, etc.
- Have the option to customize the placement and layout of its components.
Creating a Redirect
Another nice way for you is redirecting customers to a custom Thank You page after they complete their order. By default, WooCommerce offers the template_redirect hook that helps you cover this task. To create a redirect, you have to:
- Access you WooCommerce functions.php file by following the path Appearances > Theme Editor > functions.php
- Copy and paste the code shown below at the end of the functions.php file
<?php

add_action( 'template_redirect', 'woo_custom_redirect_after_purchase' );
function woo_custom_redirect_after_purchase() {
	global $wp;
	if ( is_checkout() && !empty( $wp->query_vars['order-received'] ) ) {
		wp_redirect( 'http://localhost:8888/woocommerce/custom-thank-you/' );
		exit;
	}
}
So now, your customers will be redirected to the custom Thank You page when they place an order.

Using Filters
With WooCommerce’s filters, you can change the title, make it personalized, and change the text before the order details with custom code.
Change the page title
You can change the page title by adding the code below in the functions.php file.
<?php

add_filter( 'the_title', 'woo_title_order_received', 10, 2 );

function woo_title_order_received( $title, $id ) {
	if ( function_exists( 'is_order_received_page' ) &&
	     is_order_received_page() && get_the_ID() === $id ) {
		$title = "Thank you for your order! :)";
	}
	return $title;
}
Then, you will have a page like the picture below:

Make the title personalized
You can add the customer’s name or any other elements by adding the code below in the functions.php file.
<?php

add_filter( 'the_title', 'woo_personalize_order_received_title', 10, 2 );
function woo_personalize_order_received_title( $title, $id ) {
    if ( is_order_received_page() && get_the_ID() === $id ) {
	    global $wp;

        // Get the order. Line 9 to 17 are present in order_received() in includes/shortcodes/class-wc-shortcode-checkout.php file
        $order_id  = apply_filters( 'woocommerce_thankyou_order_id', absint( $wp->query_vars['order-received'] ) );
        $order_key = apply_filters( 'woocommerce_thankyou_order_key', empty( $_GET['key'] ) ? '' : wc_clean( $_GET['key'] ) );

        if ( $order_id > 0 ) {
            $order = wc_get_order( $order_id );
            if ( $order->get_order_key() != $order_key ) {
                $order = false;
            }
        }

        if ( isset ( $order ) ) {
            //$title = sprintf( "You are awesome, %s!", esc_html( $order->billing_first_name ) ); // use this for WooCommerce versions older then v2.7
	    $title = sprintf( "You are awesome, %s!", esc_html( $order->get_billing_first_name() ) );
        }
    }
    return $title;
}
Then, you will have a page like the picture below:

Change the text before order details
In WooCommerce, the default text “Thank you. Your order has been received.” is shown before the order details. You can use the filter woocommerce_thankyou_order_received_text to add a new text to the existing one.
<?php

add_filter('woocommerce_thankyou_order_received_text', 'woo_change_order_received_text', 10, 2 );
function woo_change_order_received_text( $str, $order ) {
    $new_str = $str . ' We have emailed the purchase receipt to you.';
    return $new_str;
}
After adding this code, you will have a new text “Thank you. Your order has been received. We have emailed the purchase receipt to you.”

In case, you want to replace the existing text with a completely new one, please add the text below:
<?php

add_filter('woocommerce_thankyou_order_received_text', 'woo_change_order_received_text', 10, 2 );
function woo_change_order_received_text( $str, $order ) {
    $new_str = 'We have emailed the purchase receipt to you. Please make sure to fill <a href="http://localhost:8888/some-form.pdf">this form</a> before attending the event';
    return $new_str;
}
Then, you will have a page like the picture below:

Overriding Templates
This method allows a whole custom design, but it is more complicated than the other ones because it requires some knowledge of PHP.
As normal, all the information on WooCommerce Thank You page comes from the thankyou.php template file. But WooCommerce also allows you to use your own template. You will add it to your theme: **wp-content/themes/your theme/woocommerce/checkout/**folder. Then, you will have a custom Thank You page containing the information taken from your template.
<?php
if ( ! defined( 'ABSPATH' ) ) {
        exit;
}
?>

<div class="woocommerce-order">

        <?php if ( $order ) : ?>

                <?php if ( $order->has_status( 'failed' ) ) : ?>

                        <p class="woocommerce-notice woocommerce-notice--error woocommerce-thankyou-order-failed"><?php _e( 'Unfortunately your order cannot be processed as the originating bank/merchant has declined your transaction. Please attempt your purchase again.', 'woocommerce' ); ?></p>

                        <p class="woocommerce-notice woocommerce-notice--error woocommerce-thankyou-order-failed-actions">
                                <a href="<?php echo esc_url( $order->get_checkout_payment_url() ); ?>" class="button pay"><?php _e( 'Pay', 'woocommerce' ) ?></a>
                                <?php if ( is_user_logged_in() ) : ?>
                                        <a href="<?php echo esc_url( wc_get_page_permalink( 'myaccount' ) ); ?>" class="button pay"><?php _e( 'My account', 'woocommerce' ); ?></a>
                                <?php endif; ?>
                        </p>

                <?php else : ?>

                        <p class="woocommerce-notice woocommerce-notice--success woocommerce-thankyou-order-received"><?php echo apply_filters( 'woocommerce_thankyou_order_received_text', __( 'Thank you for doing business with us. We have emailed you the purchase receipt for this transaction.', 'woocommerce' ), $order ); ?></p>

                        <ul class="woocommerce-order-overview woocommerce-thankyou-order-details order_details">

                                <li class="woocommerce-order-overview__order order">
                                        <?php _e( 'Transaction ID:', 'woocommerce' ); ?>
                                        <strong><?php echo $order->get_order_number(); ?></strong>
                                </li>

                                <li class="woocommerce-order-overview__date date">
                                        <?php _e( 'Date:', 'woocommerce' ); ?>
                                        <strong><?php echo date_i18n( get_option( 'date_format' ), $order->get_date_created() ); ?></strong>
                                </li>

                                <li class="woocommerce-order-overview__total total">
                                        <?php _e( 'Total:', 'woocommerce' ); ?>
                                        <strong><?php echo $order->get_formatted_order_total(); ?></strong>
                                </li>

                        </ul>

                <?php endif; ?>

                <p>Since this is your first order, we are happy to extend a 10% discount on your next purchase. Use the coupon code <strong>WELCOME10</strong> to avail the discount.</p>

                <?php do_action( 'woocommerce_thankyou_' . $order->get_payment_method(), $order->get_id() ); ?>
                <?php do_action( 'woocommerce_thankyou', $order->get_id() ); ?>

        <?php else : ?>

                <p class="woocommerce-notice woocommerce-notice--success woocommerce-thankyou-order-received"><?php echo apply_filters( 'woocommerce_thankyou_order_received_text', __( 'Thank you. Your order has been received.', 'woocommerce' ), null ); ?></p>

        <?php endif; ?>

</div>
Depending on the custom content you expect, you can combine this customization method with other ones for the best Thank You page.
What you should do for a powerful Thank You page
What we really expect to gain on the Thank You page is not only confirmation but also the increase of conversion rate. Therefore, to have optimized Thank You page examples, it is essential to pay attention to the best practices below:
Be unique
Stop putting normal things on your WooCommerce Thank You page because there are dozens of those kinds out there. Why don’t you make your customers more and more happy and excited with powerful words.
“Congratulations,” “You are successful,” “Big thanks”. Don’t need to be lengthy. Just some words like that are exciting enough to attract your customers.
Be full of enthusiasm
Stop putting normal things on your WooCommerce’s thank you page because there are dozens of those kinds out there. Why don’t you make your customers more and more happy and excited with powerful words like “Congratulations,” “You are successful,” “Big thanks”. Don’t need to be lengthy. Just some words like that are exciting enough to attract your customers.
Put the best content above the fold
Your customers will only spend very little time on your page; therefore, it is advisable to put your interesting content in a visible place so that customers can see it immediately when reaching the page. It would be a good idea to add call to action right here, especially if your business has an ongoing offer or upcoming event.
Show special offers
Some guy has purchased your product, reached the Thank You page, and be about to close the tab. But don’t let him leave so easily. You will get more purchases from him if you know how to keep him on the page. The best method for this case is displaying great offers together with social share icons. If the former can help you gain repeat purchases, the latter is useful for pushing engagement.

Include the human elements
This is aimed at building up the trust of the website. You can add some images of the business owner or a video of teamworking. Real-life materials are invaluable resources in the online world, contributing to pushing people to take action.
Create an eye-catching design
Content on the page is so important, but content alone is not enough. Visitors won’t take notice of the content if the design is quite poor. Therefore, find a way to make the Thank You page attractive and stylish as expected.

Offer them a gift
Everyone loves receiving gifts. We say it for sure. Customers will get so excited if you give them something for free. Regardless of how big or small your gifts are, they will get the feeling that you are the best store owner in the world.
Don’t be wordy
Don’t let your Thank You page be filled with words and words. Your customers certainly won’t spend time reading all of them. Even they will also ignore your key content like Call-to-action on the page. After all, say no to wordiness and keep your texts clear and concise.
Don’t show promises you can’t keep
The delivery of accurate information is what your customers need from your business. If you are not sure about some kind of details, don’t add them to the page. Don’t fail with this step because it may cause long-term effects, including loss of trust and professionalism.
In conclusion,
After our sharing, perhaps you understand more about the definition, structure, and customization of a Thank You page in WooCommerce. It’s time to stop this topic here. Before saying goodbye to you, our beloved readers, we still once remind you to never forget saying “thank you” to your customers by setting up a custom Thank You page.
There are many interesting things to learn about WooCommerce Thank You page. Then, we will mention them in detail in the next articles.
For the final word, thanks for spending time on our topic. If you have any contributions, please leave your comments below. We are so happy to answer any queries.
Hi! I would like to remove all the order review in the thank you page.
I tried this code but it didn’t work. I’ve attached you an image so you can see what I want to remove
Try this:
remove_action('woocommerce_thankyou', 'woocommerce_order_details_table', 10);You can also copy the thankyou.php template to your child theme, and delete any lines of code you do not want to be shown.
try this is ok : add to functions.php
add_filter(‘woocommerce_thankyou_order_received_text’, ‘woo_change_order_received_text’, 10, 2 );
function woo_change_order_received_text( $str, $order ) {
$new_str = $str.’Thank you for your order booking, we are on processing, please kindly wait for a few.’;
return $new_str;
}
Hi Brenna,
Many thanks for your snippet! I just tried it out however (the one which personailes the thank you message to add the customer first name) but it does not work. Does it still work your end?